Seal Master: Difference between revisions
mNo edit summary |
mNo edit summary |
||
| (131 intermediate revisions by 16 users not shown) | |||
| Line 1: | Line 1: | ||
{{Item Infobox | {{Item Infobox | ||
|item= | |item=Angemon Seal | ||
|kind=Seal Item | |kind=Seal Item | ||
|class=Rare Item | |class=Rare Item | ||
|desc='''<span style="color:green">Right-click</span> to use <span style="color:green">Seal Opener</span> to be activated so as to get the buff according to the number of the seal while hunting.''' | |desc='''<span style="color:green">Right-click</span> to use <span style="color:green">Seal Opener</span> to be activated so as to get the buff according to the number of the seal while hunting.''' | ||
}} | }} | ||
* '''Seals are items dropped by certain Digimon that can be used in Seal Master System.''' | * '''Seals are items dropped by certain Digimon that can be used in Seal Master System.''' | ||
* '''Seal ability applies to the summoned digimon as passive stats.''' | * '''Seal ability applies to the summoned digimon as passive stats.''' | ||
| Line 11: | Line 10: | ||
* '''Seals increase normal attack damage, defense, block rate, evasion, hit rate, critical, HP and DS.''' | * '''Seals increase normal attack damage, defense, block rate, evasion, hit rate, critical, HP and DS.''' | ||
* '''The more various seals you collect, and the more levels you raise, the more various and stronger abilities your digimon will gain permanently.''' <br><br> | * '''The more various seals you collect, and the more levels you raise, the more various and stronger abilities your digimon will gain permanently.''' <br><br> | ||
[[File:Seal Opener Icon.png|link=]] '''Seal Opener''' - Can open the Seal Card on Seal Master System UI.<br> | [[File:Seal Opener Icon.png|link=]] '''Seal Opener''' - Can open the Seal Card on Seal Master System UI.<br> | ||
[[File:Seal Closer Icon.png|link=]] '''Seal Closer''' - Can make the Seal Cards tradable again.<br> | [[File:Seal Closer Icon.png|link=]] '''Seal Closer''' - Can make the Seal Cards tradable again.<br> | ||
- Both are obtained from Cash Shop, [[Server Reward]], events or buying from another player.<br><br> | - Both are obtained from Cash Shop, [[Server Reward]], events or buying from another player.<br><br> | ||
* '''Amount of Seal Card & Seal Opener required.''' <br><br> | * '''Amount of Seal Card & Seal Opener required.''' <br><br> | ||
{|! style="text-align:left;" | {|! style="text-align:left;" | ||
| Line 28: | Line 24: | ||
|- | |- | ||
|1 Seal Opener ||1+ Seal Opener||4+ Seal Opener||10+ Seal Opener||20+ Seal Opener||60 Seal Opener | |1 Seal Opener ||1+ Seal Opener||4+ Seal Opener||10+ Seal Opener||20+ Seal Opener||60 Seal Opener | ||
|- | |||
| colspan="6" |<div style="text-align: center;"> Royal Base Hard Seal 150ea </div> | |||
|- | |||
|1~9 | |||
|10~29 | |||
|30~49 | |||
|50~?? | |||
| | |||
| | |||
|- | |||
| | |||
| | |||
| | |||
| | |||
| | |||
| | |||
|}<br> | |}<br> | ||
- 1 Seal Opener/Closer can be used on 50 Seals.<br> | - 1 Seal Opener/Closer can be used on 50 Seals.<br> | ||
- The same amount of Seal Closer is needed to make it tradable.<br> | - The same amount of Seal Closer is needed to make it tradable.<br> | ||
| Line 36: | Line 47: | ||
* '''User interface of Seal Master''' | * '''User interface of Seal Master''' | ||
- When you click the button below you get access to the Seal Master or pressing the keyboard key '''T''' | - When you click the button below you get access to the Seal Master or pressing the keyboard key '''T''' | ||
[[File: | [[File:Seal in menu.jpg|alt=]] | ||
| Line 56: | Line 66: | ||
*'''Digimon which have Seal and its abilities.''' | *'''Digimon which have Seal and its abilities.''' | ||
==AT [Attack Damage]== | ==AT [Attack Damage]== | ||
{| class="wikitable" | {| class="wikitable" | ||
|- | |- | ||
| Line 71: | Line 80: | ||
! scope="col"| Drop Location | ! scope="col"| Drop Location | ||
|- | |- | ||
! scope="row"| +0 | ! scope="row"| +0 | ||
! scope="row"| +10 | ! scope="row"| +10 | ||
| Line 84: | Line 92: | ||
| [[Silver Lake]] | | [[Silver Lake]] | ||
|- | |- | ||
! scope="row"| +0 | ! scope="row"| +0 | ||
! scope="row"| +15 | ! scope="row"| +15 | ||
| Line 95: | Line 102: | ||
| [[Guilmon]] | | [[Guilmon]] | ||
| ❌ | | ❌ | ||
| [[Snowstorm Village]] <br> [[Frozen Ground]] <br> [[Monster Card Lv1]] | | [[Snowstorm Village]] <br>[[Frozen Ground]] <br>[[Monster Card Lv1]] | ||
|- | |- | ||
! scope="row"| +0 | ! scope="row"| +0 | ||
! scope="row"| +15 | ! scope="row"| +15 | ||
| Line 108: | Line 114: | ||
| [[Patamon]] | | [[Patamon]] | ||
| ❌ | | ❌ | ||
| [[Silver Lake]] <br> [[Western Area: East]] <br> [[Monster Card Lv1]] | | [[Silver Lake]] <br>[[Western Area: East]] <br>[[Monster Card Lv1]] | ||
|- | |- | ||
! scope="row"| +0 | ! scope="row"| +0 | ||
! scope="row"| +15 | ! scope="row"| +15 | ||
| Line 121: | Line 126: | ||
| [[Mushroomon]] | | [[Mushroomon]] | ||
| ❌ | | ❌ | ||
| [[Western Village]] <br> [[Silver Lake]] <br> [[Versandi Terminal]] <br> [[Monster Card Lv2]] | | [[Western Village]] <br>[[Silver Lake]] <br>[[Versandi Terminal]] <br>[[Monster Card Lv2]] | ||
|- | |||
!+0 | |||
!+15 | |||
!+30 | |||
!+60 | |||
!+90 | |||
!+120 | |||
!+150 | |||
|[[File:Monodramon Icon.png]] | |||
|[[Monodramon]] | |||
|❌ | |||
|[[D-Terminal-Dungeon-B2]] | |||
|- | |||
!+0 | |||
!+15 | |||
!+30 | |||
!+60 | |||
!+90 | |||
!+120 | |||
!+150 | |||
|[[File:DemiDevimon Icon.png|link=PicoDevimon]] | |||
|[[DemiDevimon|PicoDevimon]] | |||
|❌ | |||
|Event | |||
|- | |||
!+0 | |||
!+15 | |||
!+30 | |||
!+60 | |||
!+90 | |||
!+120 | |||
!+150 | |||
|[[File:Event Seal Icon (Not official version).png|link=]] | |||
|Passionate | |||
|❌ | |||
|Event | |||
|- | |||
!+0 | |||
!+15 | |||
!+30 | |||
!+60 | |||
!+90 | |||
!+120 | |||
!+150 | |||
|[[File:Event Seal Icon (Not official version).png|link=]] | |||
|Environment | |||
|❌ | |||
|Event | |||
|- | |- | ||
! scope="row"| +0 | ! scope="row"| +0 | ||
! scope="row"| +20 | ! scope="row"| +20 | ||
| Line 135: | Line 187: | ||
| ✅ 5/1 Ticket | | ✅ 5/1 Ticket | ||
|- | |- | ||
! scope="row"| +0 | ! scope="row"| +0 | ||
! scope="row"| +20 | ! scope="row"| +20 | ||
| Line 146: | Line 197: | ||
| [[Chrysalimon]] | | [[Chrysalimon]] | ||
| ✅ 5/1 Ticket | | ✅ 5/1 Ticket | ||
| [[Digimon Maze F2]] <br> [[Snowstorm Village]] | | [[Digimon Maze F2]] <br>[[Snowstorm Village]] | ||
|- | |- | ||
! scope="row"| +0 | ! scope="row"| +0 | ||
! scope="row"| +20 | ! scope="row"| +20 | ||
| Line 159: | Line 209: | ||
| [[Devimon]] | | [[Devimon]] | ||
| ❌ | | ❌ | ||
| [[Wilderness Area]] <br> | | [[Wilderness Area]] <br>[[Silent Forest]] <br>[[Crack of Devimon (Instance Dungeon)]] <br>[[Monster Card Lv4]] | ||
|- | |- | ||
! scope="row"| +0 | ! scope="row"| +0 | ||
! scope="row"| + | ! scope="row"| +20 | ||
! scope="row"| + | ! scope="row"| +40 | ||
! scope="row"| + | ! scope="row"| +80 | ||
! scope="row"| + | ! scope="row"| +120 | ||
! scope="row"| +160 | |||
! scope="row"| +200 | ! scope="row"| +200 | ||
! scope="row"| +250 | | [[File:Greymon Icon.png|link=Greymon]] | ||
| [[Greymon]] | |||
| ❌ | |||
| [[Western Area: East]] <br>[[Server Continent Desert]] <br>Event | |||
|- | |||
!+0 | |||
!+20 | |||
!+40 | |||
!+80 | |||
!+120 | |||
!+160 | |||
!+200 | |||
|[[File:ExV-mon Icon.png]] | |||
|[[ExV-mon]] | |||
|❌ | |||
|Event | |||
|- | |||
! scope="row" | +0 | |||
! scope="row" | +25 | |||
! scope="row" | +50 | |||
! scope="row" | +100 | |||
! scope="row" | +150 | |||
! scope="row" | +200 | |||
! scope="row" | +250 | |||
| [[File:Giromon Icon.png|link=Giromon]] | | [[File:Giromon Icon.png|link=Giromon]] | ||
| [[Giromon]] | | [[Giromon]] | ||
| ❌ | | ❌ | ||
| [[Digimon Maze B2]] <br> [[File Island Waterfront]] <br> [[Monster Card Lv6]] | | [[Digimon Maze B2]] <br>[[File Island Waterfront]] <br>[[Odaiba]] <br>[[Monster Card Lv6]] | ||
|- | |- | ||
! scope="row" | +0 | |||
! scope="row"| +0 | ! scope="row" | +25 | ||
! scope="row"| +25 | ! scope="row" | +50 | ||
! scope="row"| +50 | ! scope="row" | +100 | ||
! scope="row"| +100 | ! scope="row" | +150 | ||
! scope="row"| +150 | ! scope="row" | +200 | ||
! scope="row"| +200 | ! scope="row" | +250 | ||
! scope="row"| +250 | |||
| [[File:Cherrymon Icon.png|link=Cherrymon]] | | [[File:Cherrymon Icon.png|link=Cherrymon]] | ||
| [[Cherrymon]] | | [[Cherrymon]] | ||
| ❌ | | ❌ | ||
| [[Silver Lake]] <br> [[Lost Historic Site]] <br> [[Server Continent Canyon]] <br> [[Monster Card Lv5]] | | [[Silver Lake]] <br>[[Lost Historic Site]] <br>[[Server Continent Canyon]] <br>[[Monster Card Lv5]] | ||
|- | |||
! scope="row" | +0 | |||
! scope="row" | +25 | |||
! scope="row" | +50 | |||
! scope="row" | +100 | |||
! scope="row" | +150 | |||
! scope="row" | +200 | |||
! scope="row" | +250 | |||
| [[File:MarineDevimon Icon.png|link=MarineDevimon]] | |||
| [[MarineDevimon]] | |||
| ❌ | |||
| [[Scar of Water Crystal]] (pick up) <br>[[Monster Card Lv6]] | |||
|- | |||
! scope="row" | +0 | |||
! scope="row" | +25 | |||
! scope="row" | +50 | |||
! scope="row" | +100 | |||
! scope="row" | +150 | |||
! scope="row" | +200 | |||
! scope="row" | +250 | |||
| [[File:Myotismon Icon.png|link=Myotismon]] | |||
| [[Myotismon]] | |||
| ❌ | |||
| [[Shibuya]] (raid box) <br>[[Minato City]] (raid box) <br>[[Big Sight]] (raid box) <br>[[Fuji TV Rooftop]] (raid box) | |||
|- | |- | ||
! scope="row"| +0 | ! scope="row"| +0 | ||
! scope="row"| +25 | ! scope="row"| +25 | ||
| Line 195: | Line 290: | ||
! scope="row"| +200 | ! scope="row"| +200 | ||
! scope="row"| +250 | ! scope="row"| +250 | ||
| [[File: | | [[File:Calumon Icon.png|link=Culumon]] | ||
| [[ | | [[Culumon]] | ||
| ❌ | | ❌ | ||
| [[ | | Event | ||
|- | |||
!+0 | |||
!+25 | |||
!+50 | |||
!+100 | |||
!+150 | |||
!+200 | |||
!+250 | |||
|[[File:Orochimon Icon.png|link=Orochimon]] | |||
|[[Orochimon]] | |||
|❌ | |||
|PawnChessmon B Item Craft (D-Terminal) | |||
|- | |- | ||
!+0 | |||
! | !+25 | ||
! | !+50 | ||
! | !+100 | ||
! | !+150 | ||
! | !+200 | ||
! | !+250 | ||
! | |[[File:Silphymon Icon.png|link=Silphymon]] | ||
| [[File: | |[[Silphymon]] | ||
| [[ | |❌ | ||
| ❌ | |Event | ||
| | |||
|- | |- | ||
! scope="row" | +0 | |||
! scope="row"| +0 | ! scope="row" | +30 | ||
! scope="row"| +30 | ! scope="row" | +60 | ||
! scope="row"| +60 | ! scope="row" | +120 | ||
! scope="row"| +120 | ! scope="row" | +180 | ||
! scope="row"| +180 | ! scope="row" | +240 | ||
! scope="row"| +240 | ! scope="row" | +300 | ||
! scope="row"| +300 | |||
| [[File:Quinglongmon Icon.png|link=Quinglongmon]] | | [[File:Quinglongmon Icon.png|link=Quinglongmon]] | ||
| [[Azulongmon]] | | [[Azulongmon|Qinglongmon]] | ||
| ❌ | | ❌ | ||
| [[Descending Thunder God]] | | [[Descending Thunder God]] (raid box) | ||
|- | |- | ||
! scope="row"| +0 | ! scope="row"| +0 | ||
! scope="row"| +30 | ! scope="row"| +30 | ||
| Line 237: | Line 341: | ||
| [[Examon]] | | [[Examon]] | ||
| ❌ | | ❌ | ||
| [[Versandi Terminal]] <br> [[Royal Base]] | | [[Versandi Terminal]] (raid reward) <br>[[Royal Base]] (pick up) | ||
|- | |- | ||
! scope="row"| +0 | ! scope="row"| +0 | ||
! scope="row"| +30 | ! scope="row"| +30 | ||
| Line 250: | Line 353: | ||
| [[Omegamon]] | | [[Omegamon]] | ||
| ❌ | | ❌ | ||
| [[Versandi Terminal]] | | [[Versandi Terminal]] (raid reward, rank 1 only) | ||
|- | |- | ||
! scope="row"| +0 | ! scope="row"| +0 | ||
! scope="row"| +30 | ! scope="row"| +30 | ||
| Line 263: | Line 365: | ||
| [[Dexmon]] | | [[Dexmon]] | ||
| ❌ | | ❌ | ||
| [[Royal Base]] | | [[Royal Base]] (pick up) | ||
|- | |- | ||
! scope="row"| +0 | ! scope="row"| +0 | ||
! scope="row"| +30 | ! scope="row"| +30 | ||
| Line 276: | Line 377: | ||
| [[VenomMyotismon]] | | [[VenomMyotismon]] | ||
| ❌ | | ❌ | ||
| [[Venomous Vortex]] | | [[Venomous Vortex]] (raid box) | ||
|- | |- | ||
!+0 | |||
! | !+30 | ||
! scope="row"| + | !+60 | ||
!+120 | |||
!+180 | |||
!+240 | |||
!+300 | |||
|[[File:Megidramon Icon.png]] | |||
|[[Megidramon]] | |||
|❌ | |||
|PawnChessmon B Item Craft (Shinjuku) | |||
Event | |||
|- | |||
!+0 | |||
!+30 | |||
!+60 | |||
!+120 | |||
!+180 | |||
!+240 | |||
!+300 | |||
|[[File:Event Seal Icon (Not official version).png|link=]] | |||
|10th Year Anniversary | |||
|❌ | |||
|Event | |||
|- | |||
!+0 | |||
!+30 | |||
!+60 | |||
!+120 | |||
!+180 | |||
!+240 | |||
!+300 | |||
|[[File:Event Seal Icon (Not official version).png|link=]] | |||
|11th Year Anniversary | |||
|❌ | |||
|Event | |||
|- | |||
!+0 | |||
!+30 | |||
!+60 | |||
!+120 | |||
!+180 | |||
!+240 | |||
!+300 | |||
|[[File:Machinedramon Icon.png]] | |||
|[[Machinedramon]] | |||
|❌ | |||
|Event | |||
|- | |||
!+0 | |||
!+30 | |||
!+60 | |||
!+120 | |||
!+180 | |||
!+240 | |||
!+300 | |||
|[[File:Chaosmon Icon.png]] | |||
|[[Chaosmon]] | |||
|❌ | |||
|Event | |||
|- | |||
!+0 | |||
!+30 | |||
!+60 | |||
!+120 | |||
!+180 | |||
!+240 | |||
!+300 | |||
|[[File:MirageGaogamon (Burst Mode) Icon.png]] | |||
|[[MirageGaogamon (Burst Mode)]] | |||
|❌ | |||
|Event | |||
|- | |||
!+0 | |||
!+30 | |||
!+60 | |||
!+120 | |||
!+180 | |||
!+240 | |||
!+300 | |||
|[[File:Boltboutamon Icon.png]] | |||
|[[Boltboutamon]] | |||
|❌ | |||
|Event | |||
|- | |||
!+0 | |||
!+30 | |||
!+60 | |||
!+120 | |||
!+180 | |||
!+240 | |||
!+300 | |||
|[[File:Alphamon Icon.png]] | |||
|[[Alphamon]] | |||
|❌ | |||
|Event | |||
|- | |||
!+0 | |||
!+30 | |||
!+60 | |||
!+120 | |||
!+180 | |||
!+240 | |||
!+300 | |||
|[[File:Imperialdramon (Dragon Mode)(Jogress) Icon.png]] | |||
|[[Imperialdramon (Dragon Mode)|Imperialdramon]] | |||
|❌ | |||
|Event | |||
|- | |||
!+0 | |||
!+30 | |||
!+60 | |||
!+120 | |||
!+180 | |||
!+240 | |||
!+300 | |||
|[[File:Kuzuhamon Icon.png|alt=]] | |||
|[[Kuzuhamon]] | |||
|❌ | |||
|Event | |||
|- | |||
! colspan="2" scope="row" | Maximum | |||
! scope="row" | +8400 | |||
| | |||
|} | |} | ||
==CT [Critical Hit Rate]== | ==CT [Critical Hit Rate]== | ||
{| class="wikitable" | {| class="wikitable" | ||
|- | |- | ||
| Line 299: | Line 519: | ||
! scope="col"| Drop Location | ! scope="col"| Drop Location | ||
|- | |- | ||
! scope="row"|+0% | ! scope="row"|+0% | ||
! scope="row"|+0.1% | ! scope="row"|+0.1% | ||
| Line 312: | Line 531: | ||
| [[Yokohama Village]] <br> [[Silver Lake]] | | [[Yokohama Village]] <br> [[Silver Lake]] | ||
|- | |- | ||
!+0% | |||
!+0.1% | |||
!+0.2% | |||
!+0.4% | |||
!+0.6% | |||
!+0.8% | |||
!+1% | |||
|[[File:PawnChessmon (Black) Icon.png]] | |||
|[[PawnChessmon (Black)|PawnChessmon B]] | |||
|❌ | |||
|Event | |||
|- | |||
! scope="row"|+0% | ! scope="row"|+0% | ||
! scope="row"|+0.15% | ! scope="row"|+0.15% | ||
| Line 325: | Line 555: | ||
| [[Yokohama Village]] <br> [[Silver Lake]] <br> [[Versandi Terminal]] | | [[Yokohama Village]] <br> [[Silver Lake]] <br> [[Versandi Terminal]] | ||
|- | |- | ||
! scope="row"|+0% | ! scope="row"|+0% | ||
! scope="row"|+0.15% | ! scope="row"|+0.15% | ||
| Line 338: | Line 567: | ||
| [[Silent Forest]] | | [[Silent Forest]] | ||
|- | |- | ||
!+0% | |||
! | !+0.15% | ||
! | !+0.3% | ||
! | !+0.6% | ||
! | !+0.9% | ||
! | !+1.2% | ||
! | !+1.5% | ||
! | |[[File:CommanDramon_Icon.png|link=CommanDramon]] | ||
| [[File: | |[[CommanDramon]] | ||
| [[ | |||
| ❌ | | ❌ | ||
| [[ | |[[Big Sight]] | ||
|- | |- | ||
!+0% | |||
! scope="row"|+0% | !+0.15% | ||
! scope="row"|+0.2% | !+0.3% | ||
! scope="row"|+0.4% | !+0.6% | ||
! scope="row"|+0.8% | !+0.9% | ||
! scope="row"|+1.2% | !+1.2% | ||
! scope="row"|+1.6% | !+1.5% | ||
! scope="row"|+2% | |[[File:Lalamon Icon.png]] | ||
| [[File:Togemon Icon.png|link=Togemon]] | |[[Lalamon]] | ||
|❌ | |||
|Event | |||
|- | |||
!+0% | |||
!+0.15% | |||
!+0.3% | |||
!+0.6% | |||
!+0.9% | |||
!+1.2% | |||
!+1.5% | |||
|[[File:Event Seal Icon (Not official version).png|link=]] | |||
|Conversion | |||
|❌ | |||
|Event | |||
|- | |||
!+0% | |||
!+0.15% | |||
!+0.3% | |||
!+0.6% | |||
!+0.9% | |||
!+1.2% | |||
!+1.5% | |||
|[[File:Event Seal Icon (Not official version).png|link=]] | |||
|Hope | |||
|❌ | |||
|Event | |||
|- | |||
! scope="row" |+0% | |||
! scope="row" |+0.2% | |||
! scope="row" |+0.4% | |||
! scope="row" |+0.8% | |||
! scope="row" |+1.2% | |||
! scope="row" |+1.6% | |||
! scope="row" |+2% | |||
| [[File:Kyuubimon Icon.png|link=Kyuubimon]] | |||
| [[Kyuubimon]] | |||
| ❌ | |||
| [[Oil Refinery-1]] <br> [[Oil Refinery-2]] <br> [[Oil Refinery-3]] <br> [[Wilderness Area]] <br> [[Wind Valley]] <br> [[Dark Tower Wasteland]] <br> [[Digimon Farm]] <br> [[Ruined Historic]] <br> [[Western Area: West]] <br> [[Monster Card Lv4]] | |||
|- | |||
! scope="row" |+0% | |||
! scope="row" |+0.2% | |||
! scope="row" |+0.4% | |||
! scope="row" |+0.8% | |||
! scope="row" |+1.2% | |||
! scope="row" |+1.6% | |||
! scope="row" |+2% | |||
| [[File:Togemon Icon.png|link=Togemon]] | |||
| [[Togemon]] | | [[Togemon]] | ||
| ✅ 5/1 Ticket | | ✅ 5/1 Ticket | ||
| Western Village | | Western Village | ||
|- | |- | ||
! scope="row" |+0% | |||
! scope="row"|+0% | ! scope="row" |+0.2% | ||
! scope="row"|+0.2% | ! scope="row" |+0.4% | ||
! scope="row"|+0.4% | ! scope="row" |+0.8% | ||
! scope="row"|+0.8% | ! scope="row" |+1.2% | ||
! scope="row"|+1.2% | ! scope="row" |+1.6% | ||
! scope="row"|+1.6% | ! scope="row" |+2% | ||
! scope="row"|+2% | | [[File:Tylomon Icon.png|link=Tylomon]] | ||
| [[File:Tylomon Icon.png|link=Tylomon]] | |||
| [[Tylomon]] | | [[Tylomon]] | ||
| ❌ | | ❌ | ||
| [[Minato City]] | | [[Minato City]] | ||
|- | |- | ||
! scope="row" |+0% | |||
! scope="row" |+0.2% | |||
! scope="row"|+0% | ! scope="row" |+0.4% | ||
! scope="row"|+0.25% | ! scope="row" |+0.8% | ||
! scope="row"|+0.5% | ! scope="row" |+1.2% | ||
! scope="row"|+1.0% | ! scope="row" |+1.6% | ||
! scope="row"|+1.5% | ! scope="row" |+2% | ||
! scope="row"|+2.0% | | [[File:Gaogamon Icon.png|link=Gaogamon]] | ||
! scope="row"|+2.5% | | [[Gaogamon]] | ||
| [[File:Datamon Icon.png|link=Datamon]] | | ❌ | ||
| Event | |||
|- | |||
! scope="row" |+0% | |||
! scope="row" |+0.25% | |||
! scope="row" |+0.5% | |||
! scope="row" |+1.0% | |||
! scope="row" |+1.5% | |||
! scope="row" |+2.0% | |||
! scope="row" |+2.5% | |||
| [[File:Datamon Icon.png|link=Datamon]] | |||
| [[Datamon]] | | [[Datamon]] | ||
| ❌ | | ❌ | ||
| [[Datamon Maze]] <br> [[Versandi Terminal]] | | [[Datamon Maze]] (pick up) <br> [[Versandi Terminal]] | ||
|- | |- | ||
! scope="row" |+0% | |||
! scope="row"|+0% | ! scope="row" |+0.25% | ||
! scope="row"|+0.25% | ! scope="row" |+0.5% | ||
! scope="row"|+0.5% | ! scope="row" |+1.0% | ||
! scope="row"|+1.0% | ! scope="row" |+1.5% | ||
! scope="row"|+1.5% | ! scope="row" |+2.0% | ||
! scope="row"|+2.0% | ! scope="row" |+2.5% | ||
! scope="row"|+2.5% | | [[File:Volcamon Icon.png|link=Volcamon]] | ||
| [[File:Volcamon Icon.png|link=Volcamon]] | |||
| [[Volcamon]] | | [[Volcamon]] | ||
| ✅ 1/1 Ticket | | ✅ 1/1 Ticket | ||
| [[Digimon Maze Entrance]] | | [[Digimon Maze Entrance]] <br> [[Server Continent Pyramid]] | ||
|- | |- | ||
! scope="row" |+0% | |||
! scope="row"|+0% | ! scope="row" |+0.25% | ||
! scope="row"|+0.25% | ! scope="row" |+0.5% | ||
! scope="row"|+0.5% | ! scope="row" |+1.0% | ||
! scope="row"|+1.0% | ! scope="row" |+1.5% | ||
! scope="row"|+1.5% | ! scope="row" |+2.0% | ||
! scope="row"|+2.0% | ! scope="row" |+2.5% | ||
! scope="row"|+2.5% | | [[File:Vajiramon Icon.png|link=Vajiramon]] | ||
| [[File:Vajiramon Icon.png|link=Vajiramon]] | |||
| [[Vajiramon]] | | [[Vajiramon]] | ||
| ❌ | | ❌ | ||
| [[Stadium]] | | [[Stadium]] | ||
|- | |- | ||
! scope="row" |+0% | |||
! scope="row"|+0% | ! scope="row" |+0.25% | ||
! scope="row"|+0.3% | ! scope="row" |+0.5% | ||
! scope="row"|+0.6% | ! scope="row" |+1.0% | ||
! scope="row"|+1.2% | ! scope="row" |+1.5% | ||
! scope="row"|+1.8% | ! scope="row" |+2.0% | ||
! scope="row"|+2.4% | ! scope="row" |+2.5% | ||
! scope="row"|+3% | | [[File:RizeGreymon Icon.png|link=RizeGreymon]] | ||
| [[RizeGreymon]] | |||
| ❌ | |||
| Event | |||
|- | |||
!+0% | |||
!+0.25% | |||
!+0.5% | |||
!+1.0% | |||
!+1.5% | |||
!+2.0% | |||
!+2.5% | |||
|[[File:Phantomon Icon.png]] | |||
|[[Phantomon]] | |||
|❌ | |||
|Event | |||
|- | |||
!+0% | |||
!+0.25% | |||
!+0.5% | |||
!+1.0% | |||
!+1.5% | |||
!+2.0% | |||
!+2.5% | |||
|[[File:MagnaAngemon Icon.png]] | |||
|[[MagnaAngemon]] | |||
|❌ | |||
|Event | |||
|- | |||
! scope="row" |+0% | |||
! scope="row" |+0.3% | |||
! scope="row" |+0.6% | |||
! scope="row" |+1.2% | |||
! scope="row" |+1.8% | |||
! scope="row" |+2.4% | |||
! scope="row" |+3% | |||
| [[File:SaberLeomon Icon.png|link=SaberLeomon]] | | [[File:SaberLeomon Icon.png|link=SaberLeomon]] | ||
| [[SaberLeomon]] | | [[SaberLeomon]] | ||
| Line 430: | Line 747: | ||
| [[Oil Refinery-3]] <br> [[Infinite Ice Wall]] <br> [[Monster Card Lv7]] | | [[Oil Refinery-3]] <br> [[Infinite Ice Wall]] <br> [[Monster Card Lv7]] | ||
|- | |- | ||
!+0% | |||
!+0.3% | |||
!+0.6% | |||
!+1.2% | |||
!+1.8% | |||
!+2.4% | |||
!+3% | |||
|[[File:MetalGarurumon Icon.png]] | |||
|[[MetalGarurumon]] | |||
|❌ | |||
|[[Distorted Data Village]] | |||
|- | |||
!+0% | |||
!+0.3% | |||
!+0.6% | |||
!+1.2% | |||
!+1.8% | |||
!+2.4% | |||
!+3% | |||
|[[File:Jesmon Icon.png]] | |||
|[[Jesmon]] | |||
|❌ | |||
|Event | |||
|- | |||
! scope="row"|+0% | ! scope="row"|+0% | ||
! scope="row"|+0.35% | ! scope="row"|+0.35% | ||
| Line 443: | Line 783: | ||
| Event | | Event | ||
|- | |- | ||
! scope="row"|+0% | |||
! scope="row" colspan="2"| Maximum | ! scope="row"|+0.35% | ||
| + | ! scope="row"|+0.7% | ||
! scope="row"|+1.4% | |||
! scope="row"|+2.1% | |||
! scope="row"|+2.8% | |||
! scope="row"|+3.5% | |||
| [[File:PrinceMamemon Icon.png|link=PrinceMamemon]] | |||
| [[PrinceMamemon]] | |||
| ❌ | |||
| Event | |||
|- | |||
!+0% | |||
!+0.35% | |||
!+0.7% | |||
!+1.4% | |||
!+2.1% | |||
!+2.8% | |||
!+3.5% | |||
|[[File:Ravemon (Burst Mode) Icon.png]] | |||
|[[Ravemon (Burst Mode)]] | |||
|❌ | |||
|Event | |||
|- | |||
!+0% | |||
!+0.35% | |||
!+0.7% | |||
!+1.4% | |||
!+2.1% | |||
!+2.8% | |||
!+3.5% | |||
|[[File:ShadowSeraphimon Icon.png]] | |||
|[[ShadowSeraphimon]] | |||
|❌ | |||
|Event | |||
|- | |||
! scope="row" |+0% | |||
! scope="row" |+0.4% | |||
! scope="row" |+0.8% | |||
! scope="row" |+1.6% | |||
! scope="row" |+2.4% | |||
! scope="row" |+3.2% | |||
! scope="row" |+4% | |||
| [[File:Omegamon_Zwart Icon.png|link=Omegamon_Zwart]] | |||
| [[Omegamon Zwart]] | |||
| ❌ | |||
| Event | |||
|- | |||
!+0% | |||
!+0.4% | |||
!+0.8% | |||
!+1.6% | |||
!+2.4% | |||
!+3.2% | |||
!+4% | |||
|[[File:Shoutmon X2 Icon.png|link=Shoutmon X2]] | |||
|[[Shoutmon X2]] | |||
|❌ | |||
|Event | |||
|- | |||
! colspan="2" scope="row" | Maximum | |||
! scope="row" | +65.0% | |||
|} | |} | ||
==HT [Hit Rate]== | ==HT [Hit Rate]== | ||
{| class="wikitable" | {| class="wikitable" | ||
|- | |- | ||
| Line 464: | Line 861: | ||
! scope="col"| Drop Location | ! scope="col"| Drop Location | ||
|- | |- | ||
! scope="row"| +0 | ! scope="row"| +0 | ||
! scope="row"| +10 | ! scope="row"| +10 | ||
| Line 477: | Line 873: | ||
| [[Yokohama Village]] <br> [[Server Continent Desert]] <br> [[Monster Card Lv1]] | | [[Yokohama Village]] <br> [[Server Continent Desert]] <br> [[Monster Card Lv1]] | ||
|- | |- | ||
! scope="row"| +0 | ! scope="row"| +0 | ||
! scope="row"| +10 | ! scope="row"| +10 | ||
| Line 490: | Line 885: | ||
| [[Server Continent Desert]] <br> [[Versandi Terminal]] | | [[Server Continent Desert]] <br> [[Versandi Terminal]] | ||
|- | |- | ||
! scope="row"| +0 | ! scope="row"| +0 | ||
! scope="row"| +10 | ! scope="row"| +10 | ||
| Line 503: | Line 897: | ||
| [[Snowstorm Village]] <br> [[Shadow Labyrinth]] | | [[Snowstorm Village]] <br> [[Shadow Labyrinth]] | ||
|- | |- | ||
! +0 | |||
! scope="row"| +0 | ! +10 | ||
! scope="row"| +20 | ! +20 | ||
! +40 | |||
! +60 | |||
! +80 | |||
! +100 | |||
|[[File:Floramon_Icon.png|link=Floramon]] | |||
|[[Floramon]] | |||
| ❌ | |||
|PawnChessmon B Item Craft (D-Terminal) | |||
|- | |||
! +0 | |||
! +10 | |||
! +20 | |||
! +40 | |||
! +60 | |||
! +80 | |||
! +100 | |||
|[[File:Hackmon_Icon.png|link=Hackmon]] | |||
|[[Hackmon]] | |||
| ❌ | |||
|Event | |||
|- | |||
! +0 | |||
! +10 | |||
! +20 | |||
! +40 | |||
! +60 | |||
! +80 | |||
! +100 | |||
|[[File:Event Seal Icon (Not official version).png|link=]] | |||
|Seal of Marksman | |||
| ❌ | |||
|Event | |||
|- | |||
!+0 | |||
!+10 | |||
!+20 | |||
!+40 | |||
!+60 | |||
!+80 | |||
!+100 | |||
|[[File:Event Seal Icon (Not official version).png|link=]] | |||
|Exploration Seal | |||
|❌ | |||
|Event | |||
|- | |||
! scope="row"| +0 | |||
! scope="row"| +20 | |||
! scope="row"| +40 | ! scope="row"| +40 | ||
! scope="row"| +80 | ! scope="row"| +80 | ||
| Line 516: | Line 957: | ||
| [[Western Area: West]] | | [[Western Area: West]] | ||
|- | |- | ||
! scope="row"| +0 | ! scope="row"| +0 | ||
! scope="row"| +20 | ! scope="row"| +20 | ||
| Line 529: | Line 969: | ||
| [[Oil Refinery-1]] | | [[Oil Refinery-1]] | ||
|- | |- | ||
! scope="row"| +0 | ! scope="row"| +0 | ||
! scope="row"| +20 | ! scope="row"| +20 | ||
| Line 542: | Line 981: | ||
| [[Versandi Terminal]] | | [[Versandi Terminal]] | ||
|- | |- | ||
! scope="row"| +0 | ! scope="row"| +0 | ||
! scope="row"| +20 | ! scope="row"| +20 | ||
| Line 555: | Line 993: | ||
| [[Minato City]] | | [[Minato City]] | ||
|- | |- | ||
! scope="row"| +0 | |||
! scope="row"| +20 | |||
! scope="row"| +40 | |||
! scope="row"| +80 | |||
! scope="row"| +120 | |||
! scope="row"| +160 | |||
! scope="row"| +200 | |||
|[[File:GeoGreymon Icon.png|link=GeoGreymon]] | |||
|[[GeoGreymon]] | |||
| ❌ | |||
| Event | |||
|- | |||
! scope="row"| +0 | ! scope="row"| +0 | ||
! scope="row"| +30 | ! scope="row"| +30 | ||
| Line 567: | Line 1,015: | ||
|[[Garudamon]] | |[[Garudamon]] | ||
| ✅ 1/1 Ticket | | ✅ 1/1 Ticket | ||
| [[Ruined Historic]] <br> [[Uprising Flame]] | | [[Ruined Historic]] <br> [[Uprising Flame]] (pick up) | ||
|- | |- | ||
! scope="row"| +0 | ! scope="row"| +0 | ||
! scope="row"| +30 | ! scope="row"| +30 | ||
| Line 580: | Line 1,027: | ||
| [[Knightmon]] | | [[Knightmon]] | ||
| ❌ | | ❌ | ||
|[[Oil Refinery-1]] <br> [[Digimon Maze B1]] <br> [[Secret Ancient Ruins]] <br> [[Monster Card Lv5]] | |[[Oil Refinery-1]] <br> [[Digimon Maze B1]] <br> [[Secret Ancient Ruins]] <br> [[Odaiba]] <br> [[Monster Card Lv5]] | ||
|- | |- | ||
! scope="row"| +0 | ! scope="row"| +0 | ||
! scope="row"| +40 | ! scope="row"| +30 | ||
! scope="row"| +80 | ! scope="row"| +60 | ||
! scope="row"| +120 | |||
! scope="row"| +180 | |||
! scope="row"| +240 | |||
! scope="row"| +300 | |||
| [[File:BlackWereGarurumon Icon.png|link=BlackWereGarurumon]] | |||
| [[BlackWereGarurumon]] | |||
| ❌ | |||
|[[Odaiba]] | |||
|- | |||
!+0 | |||
!+30 | |||
!+60 | |||
!+120 | |||
!+180 | |||
!+240 | |||
!+300 | |||
|[[File:Crowmon Icon.png]] | |||
|[[Crowmon]] | |||
|❌ | |||
|Event | |||
|- | |||
! scope="row"| +0 | |||
! scope="row"| +30 | |||
! scope="row"| +60 | |||
! scope="row"| +120 | |||
! scope="row"| +180 | |||
! scope="row"| +240 | |||
! scope="row"| +300 | |||
| [[File:MetalGreymon Icon.png|link=MetalGreymon]] | |||
| [[MetalGreymon]] | |||
| ❌ | |||
| [[Western Area: West]] <br> [[Ruined Historic]] | |||
|- | |||
!+0 | |||
!+30 | |||
!+60 | |||
!+120 | |||
!+180 | |||
!+240 | |||
!+300 | |||
|[[File:Antylamon Icon.png|link=Antylamon]] | |||
|[[Antylamon]] | |||
|❌ | |||
|Event | |||
|- | |||
!+0 | |||
!+30 | |||
!+60 | |||
!+120 | |||
!+180 | |||
!+240 | |||
!+300 | |||
|[[File:Blossomon Icon.png|link=Blossomon]] | |||
|[[Blossomon]] | |||
|❌ | |||
|Event | |||
|- | |||
! scope="row"| +0 | |||
! scope="row"| +40 | |||
! scope="row"| +80 | |||
! scope="row"| +160 | ! scope="row"| +160 | ||
! scope="row"| +240 | ! scope="row"| +240 | ||
| Line 595: | Line 1,101: | ||
| [[Secret Ancient Ruins]] <br> [[Monster Card Lv7]] | | [[Secret Ancient Ruins]] <br> [[Monster Card Lv7]] | ||
|- | |- | ||
! scope="row"| +0 | ! scope="row"| +0 | ||
! scope="row"| +40 | ! scope="row"| +40 | ||
| Line 606: | Line 1,111: | ||
|[[LordKnightmon]] | |[[LordKnightmon]] | ||
| ❌ | | ❌ | ||
| [[Royal Base]] | | [[Royal Base]] (pick up) | ||
|- | |||
!+0 | |||
!+40 | |||
!+80 | |||
!+160 | |||
!+240 | |||
!+320 | |||
!+400 | |||
|[[File:Beelzemon Icon.png]] | |||
|[[Beelzemon]] | |||
|❌ | |||
|Event | |||
|- | |||
!+0 | |||
!+40 | |||
!+80 | |||
!+160 | |||
!+240 | |||
!+320 | |||
!+400 | |||
|[[File:Rosemon Icon.png]] | |||
|[[Rosemon]] | |||
|❌ | |||
|Event | |||
|- | |- | ||
! scope="row"| +0 | ! scope="row"| +0 | ||
! scope="row"| +50 | ! scope="row"| +50 | ||
| Line 619: | Line 1,147: | ||
|[[Baihumon (Mega)|Baihumon]] | |[[Baihumon (Mega)|Baihumon]] | ||
| ❌ | | ❌ | ||
| [[Trace of Black Steel]] | | [[Trace of Black Steel]] (raid box) | ||
|- | |- | ||
! scope="row"| +0 | ! scope="row"| +0 | ||
! scope="row"| +50 | ! scope="row"| +50 | ||
| Line 632: | Line 1,159: | ||
|[[Craniamon]] | |[[Craniamon]] | ||
| ❌ | | ❌ | ||
| [[Royal Base]] | | [[Royal Base]] (pick up) | ||
|- | |- | ||
! scope="row"| +0 | ! scope="row"| +0 | ||
! scope="row"| +50 | ! scope="row"| +50 | ||
| Line 647: | Line 1,173: | ||
| Event | | Event | ||
|- | |- | ||
!+0 | |||
! scope="row" colspan="2"| Maximum | !+50 | ||
! scope="row"| + | !+100 | ||
!+200 | |||
!+300 | |||
!+400 | |||
!+500 | |||
|[[File:MaloMyotismon Icon.png]] | |||
|[[BelialVamdemon|Belial Vamdemon]] | |||
|❌ | |||
|Event | |||
|- | |||
! scope="row"| +0 | |||
! scope="row"| +55 | |||
! scope="row"| +110 | |||
! scope="row"| +220 | |||
! scope="row"| +330 | |||
! scope="row"| +440 | |||
! scope="row"| +550 | |||
|[[File:Apocalymon Icon.png|link=Apocalymon]] | |||
|[[Apocalymon]] | |||
| ❌ | |||
| Event | |||
|- | |||
! colspan="2" scope="row" | Maximum | |||
! scope="row" | +7900 | |||
|} | |} | ||
==HP [Health Points] == | ==HP [Health Points] == | ||
{| class="wikitable" | {| class="wikitable" | ||
|- | |- | ||
| Line 668: | Line 1,215: | ||
! scope="col"| Drop Location | ! scope="col"| Drop Location | ||
|- | |- | ||
! scope="row"| +0 | ! scope="row"| +0 | ||
! scope="row"| +15 | ! scope="row"| +15 | ||
| Line 681: | Line 1,227: | ||
| [[Server Continent Desert]] <br> [[Server Continent Canyon]] <br> [[Server Continent Pyramid]] <br> [[Datamon Maze]] | | [[Server Continent Desert]] <br> [[Server Continent Canyon]] <br> [[Server Continent Pyramid]] <br> [[Datamon Maze]] | ||
|- | |- | ||
! scope="row"| +0 | ! scope="row"| +0 | ||
! scope="row"| +15 | ! scope="row"| +15 | ||
| Line 694: | Line 1,239: | ||
| [[Digimon Maze F1]] <br> [[D-Terminal-Dungeon-B2]] <br> [[Yokohama Village]] <br> [[Monster Card Lv2]] | | [[Digimon Maze F1]] <br> [[D-Terminal-Dungeon-B2]] <br> [[Yokohama Village]] <br> [[Monster Card Lv2]] | ||
|- | |- | ||
! scope="row"| +0 | ! scope="row"| +0 | ||
! scope="row"| +15 | ! scope="row"| +15 | ||
| Line 707: | Line 1,251: | ||
| [[Silver Lake]] | | [[Silver Lake]] | ||
|- | |- | ||
! scope="row"| +0 | ! scope="row"| +0 | ||
! scope="row"| +15 | ! scope="row"| +15 | ||
| Line 720: | Line 1,263: | ||
| [[Dark Tower Wasteland]] <br> [[Monster Card Lv1]] | | [[Dark Tower Wasteland]] <br> [[Monster Card Lv1]] | ||
|- | |- | ||
! scope="row"| +0 | ! scope="row"| +0 | ||
! scope="row"| + | ! scope="row"| +15 | ||
! scope="row"| + | ! scope="row"| +30 | ||
! scope="row"| + | ! scope="row"| +60 | ||
! scope="row"| +90 | |||
! scope="row"| +120 | ! scope="row"| +120 | ||
! scope="row"| +160 | ! scope="row"| +150 | ||
! scope="row"| +200 | | [[File:Gaomon Icon.png|link=Gaomon]] | ||
| [[File:Guardromon Icon.png|link=Guardromon]] | | [[Gaomon]] | ||
| [[Guardromon]] | | ❌ | ||
| Event | |||
|- | |||
! scope="row"| +0 | |||
! scope="row"| +15 | |||
! scope="row"| +30 | |||
! scope="row"| +60 | |||
! scope="row"| +90 | |||
! scope="row"| +120 | |||
! scope="row"| +150 | |||
|[[File:Event Seal Icon (Not official version).png|link=]] | |||
| Grow Well | |||
| ❌ | |||
| Event | |||
|- | |||
! scope="row"| +0 | |||
! scope="row"| +20 | |||
! scope="row"| +40 | |||
! scope="row"| +80 | |||
! scope="row"| +120 | |||
! scope="row"| +160 | |||
! scope="row"| +200 | |||
| [[File:Guardromon Icon.png|link=Guardromon]] | |||
| [[Guardromon]] | |||
| ✅ 5/1 Ticket | | ✅ 5/1 Ticket | ||
| [[Digimon Maze B1]] <br> [[Oil Refinery-2]] | | [[Digimon Maze B1]] <br> [[Oil Refinery-2]] | ||
|- | |- | ||
! scope="row"| +0 | ! scope="row"| +0 | ||
! scope="row"| +20 | ! scope="row"| +20 | ||
| Line 744: | Line 1,309: | ||
| [[Kentarumon]] | | [[Kentarumon]] | ||
| ❌ | | ❌ | ||
| [[Secret Ancient Ruins]] <br> [[Monster Card Lv4]] | | [[Secret Ancient Ruins]] (pick up) <br> [[Monster Card Lv4]] | ||
|- | |- | ||
! scope="row"| +0 | ! scope="row"| +0 | ||
! scope="row"| +20 | ! scope="row"| +20 | ||
| Line 757: | Line 1,321: | ||
| [[Soulmon]] | | [[Soulmon]] | ||
| ✅ 5/1 Ticket | | ✅ 5/1 Ticket | ||
| [[Digimon Maze F2]] <br> [[Silent Forest]] <br> [[Valley of Light]] | | [[Digimon Maze F2]] <br> [[Silent Forest]] <br> [[Valley of Light]] <br> [[Shibuya]] | ||
|- | |- | ||
! scope="row"| +0 | ! scope="row"| +0 | ||
! scope="row"| +20 | ! scope="row"| +20 | ||
| Line 772: | Line 1,335: | ||
| [[Versandi Terminal]] | | [[Versandi Terminal]] | ||
|- | |- | ||
! scope="row"| +0 | ! scope="row"| +0 | ||
! scope="row"| +20 | ! scope="row"| +20 | ||
| Line 785: | Line 1,347: | ||
| [[Shibuya]] | | [[Shibuya]] | ||
|- | |- | ||
! scope="row"| +0 | ! scope="row"| +0 | ||
! scope="row"| +25 | ! scope="row"| +20 | ||
! scope="row"| +40 | |||
! scope="row"| +80 | |||
! scope="row"| +120 | |||
! scope="row"| +160 | |||
! scope="row"| +200 | |||
| [[File:Ikkakumon Icon.png]] | |||
| [[Ikkakumon]] | |||
| ❌ | |||
| [[Frozen Ground]] | |||
|- | |||
!+0 | |||
!+20 | |||
!+40 | |||
!+80 | |||
!+120 | |||
!+160 | |||
!+200 | |||
|[[File:SunFlowmon Icon.png]] | |||
|[[SunFlowmon]] | |||
|❌ | |||
|Event | |||
|- | |||
! scope="row"| +0 | |||
! scope="row"| +20 | |||
! scope="row"| +40 | |||
! scope="row"| +80 | |||
! scope="row"| +120 | |||
! scope="row"| +160 | |||
! scope="row"| +200 | |||
| [[File:Garurumon Icon.png|link=Garurumon]] | |||
| [[Garurumon]] | |||
| ❌ | |||
| [[Wind Valley]] <br> [[Snowstorm Village]] | |||
|- | |||
!+0 | |||
!+20 | |||
!+40 | |||
!+80 | |||
!+120 | |||
!+160 | |||
!+200 | |||
|[[File:Ogremon Icon.png]] | |||
|[[Ogremon]] | |||
|❌ | |||
|Event | |||
|- | |||
! scope="row"| +0 | |||
! scope="row"| +25 | |||
! scope="row"| +50 | ! scope="row"| +50 | ||
! scope="row"| +100 | ! scope="row"| +100 | ||
| Line 810: | Line 1,419: | ||
| [[Oil Refinery-1]] <br> [[File Island Waterfront]] | | [[Oil Refinery-1]] <br> [[File Island Waterfront]] | ||
|- | |- | ||
! scope="row"| +0 | ! scope="row"| +0 | ||
! scope="row"| +30 | ! scope="row"| +25 | ||
! scope="row"| +60 | ! scope="row"| +50 | ||
! scope="row"| +120 | ! scope="row"| +100 | ||
! scope="row"| +150 | |||
! scope="row"| +200 | |||
! scope="row"| +250 | |||
| [[File:Whamon Icon.png|link=Whamon]] | |||
| [[Whamon]] | |||
| ❌ | |||
| Event | |||
|- | |||
! scope="row"| +0 | |||
! scope="row"| +30 | |||
! scope="row"| +60 | |||
! scope="row"| +120 | |||
! scope="row"| +180 | ! scope="row"| +180 | ||
! scope="row"| +240 | ! scope="row"| +240 | ||
| Line 823: | Line 1,443: | ||
| [[Oil Refinery-3]] <br> [[Versandi Terminal]] <br> [[Monster Card Lv7]] | | [[Oil Refinery-3]] <br> [[Versandi Terminal]] <br> [[Monster Card Lv7]] | ||
|- | |- | ||
!+0 | |||
!+40 | |||
!+80 | |||
!+160 | |||
!+240 | |||
!+320 | |||
!+400 | |||
|[[File:Sakuyamon Icon.png|link=Sakuyamon]] | |||
|[[Sakuyamon]] | |||
|❌ | |||
|Event | |||
|- | |||
! scope="row"| +0 | ! scope="row"| +0 | ||
! scope="row"| +50 | ! scope="row"| +50 | ||
| Line 834: | Line 1,465: | ||
| [[Ebonwumon]] | | [[Ebonwumon]] | ||
| ❌ | | ❌ | ||
| [[Scar of Water Crystal]] | | [[Scar of Water Crystal]] (raid box) | ||
|- | |- | ||
! scope="row"| +0 | ! scope="row"| +0 | ||
! scope="row"| +50 | ! scope="row"| +50 | ||
| Line 847: | Line 1,477: | ||
| [[UlforceVeedramon]] | | [[UlforceVeedramon]] | ||
| ❌ | | ❌ | ||
| [[Royal Base]] | | [[Royal Base]] (pick up) | ||
|- | |||
!+0 | |||
!+50 | |||
!+100 | |||
!+200 | |||
!+300 | |||
!+400 | |||
!+500 | |||
|[[File:WarGreymon Icon.png]] | |||
|[[WarGreymon]] | |||
|❌ | |||
|[[Dark Tower Wasteland]] | |||
|- | |||
! +0 | |||
! +50 | |||
! +100 | |||
! +200 | |||
! +300 | |||
! +400 | |||
! +500 | |||
| [[File:Lucemon_(Satan_Mode) Icon.png]] | |||
| [[Lucemon (Satan Mode)]] | |||
| ❌ | |||
| Event | |||
|- | |||
!+0 | |||
!+50 | |||
!+100 | |||
!+200 | |||
!+300 | |||
!+400 | |||
!+500 | |||
|[[File:BanchouLeomon Icon.png]] | |||
|[[BanchouLeomon]] | |||
|❌ | |||
|Event | |||
|- | |||
!+0 | |||
!+50 | |||
!+100 | |||
!+200 | |||
!+300 | |||
!+400 | |||
!+500 | |||
|[[File:MetalSeadramon Icon.png]] | |||
|[[MetalSeadramon]] | |||
|❌ | |||
|[[Marine Dragon Domain]] | |||
|- | |||
! scope="row"| +0 | |||
! scope="row"| +55 | |||
! scope="row"| +110 | |||
! scope="row"| +220 | |||
! scope="row"| +330 | |||
! scope="row"| +440 | |||
! scope="row"| +550 | |||
| [[File:ShineGreymon (Burst Mode) Icon.png|link=ShineGreymon (Burst Mode)]] | |||
| [[ShineGreymon (Burst Mode)]] | |||
| ❌ | |||
| Event | |||
|- | |- | ||
! scope="row"| +0 | ! scope="row"| +0 | ||
! scope="row"| +60 | ! scope="row"| +60 | ||
| Line 862: | Line 1,551: | ||
| Event | | Event | ||
|- | |- | ||
! scope="row" colspan="2"| Maximum | ! scope="row" colspan="2"| Maximum | ||
! scope="row"| + | ! scope="row"| +8300 | ||
|} | |} | ||
==DS [Digi-Soul Points]== | ==DS [Digi-Soul Points]== | ||
{| class="wikitable" | {| class="wikitable" | ||
|- | |- | ||
| Line 883: | Line 1,569: | ||
! scope="col"| Drop Location | ! scope="col"| Drop Location | ||
|- | |- | ||
! scope="row"| +0 | ! scope="row"| +0 | ||
! scope="row"| +10 | ! scope="row"| +10 | ||
| Line 896: | Line 1,581: | ||
| [[Silver Lake]] <br> [[Silent Forest]] <br> [[Tokyo Tower]] | | [[Silver Lake]] <br> [[Silent Forest]] <br> [[Tokyo Tower]] | ||
|- | |- | ||
! scope="row"| +0 | ! scope="row"| +0 | ||
! scope="row"| +20 | ! scope="row"| +20 | ||
| Line 908: | Line 1,592: | ||
| ✅ 10/1 Ticket | | ✅ 10/1 Ticket | ||
|- | |- | ||
! scope="row"| +0 | ! scope="row"| +0 | ||
! scope="row"| +20 | ! scope="row"| +20 | ||
| Line 921: | Line 1,604: | ||
| [[Western Village]] <br> [[Silver Lake]] <br> [[Digimon Maze F1]] <br> [[Tokyo Tower]] | | [[Western Village]] <br> [[Silver Lake]] <br> [[Digimon Maze F1]] <br> [[Tokyo Tower]] | ||
|- | |- | ||
! scope="row"| +0 | ! scope="row"| +0 | ||
! scope="row"| +20 | ! scope="row"| +20 | ||
| Line 934: | Line 1,616: | ||
| [[Oil Refinery-3]] | | [[Oil Refinery-3]] | ||
|- | |- | ||
! scope="row"| +0 | ! scope="row"| +0 | ||
! scope="row"| +20 | ! scope="row"| +20 | ||
| Line 947: | Line 1,628: | ||
| [[Versandi Terminal]] | | [[Versandi Terminal]] | ||
|- | |- | ||
! scope="row"| +0 | |||
! scope="row"| +20 | |||
! scope="row"| +40 | |||
! scope="row"| +80 | |||
! scope="row"| +120 | |||
! scope="row"| +160 | |||
! scope="row"| +200 | |||
| [[File:Biyomon Icon.png|link=Biyomon]] | |||
| [[Biyomon|piyomon]] | |||
| ❌ | |||
| [[Wilderness Area]] | |||
|- | |||
!+0 | |||
!+20 | |||
!+40 | |||
!+80 | |||
!+120 | |||
!+160 | |||
!+200 | |||
|[[File:Gladimon Icon.png|link=Gladimon]] | |||
|[[Gladimon]] | |||
|❌ | |||
|Event | |||
|- | |||
!+0 | |||
!+20 | |||
!+40 | |||
!+80 | |||
!+120 | |||
!+160 | |||
!+200 | |||
|[[File:Event Seal Icon (Not official version).png|link=]] | |||
|Heat Wave | |||
|❌ | |||
|Event | |||
|- | |||
!+0 | |||
!+20 | |||
!+40 | |||
!+80 | |||
!+120 | |||
!+160 | |||
!+200 | |||
|[[File:Event Seal Icon (Not official version).png|link=]] | |||
|Happiness | |||
|❌ | |||
|Event | |||
|- | |||
! scope="row"| +0 | ! scope="row"| +0 | ||
! scope="row"| +30 | ! scope="row"| +30 | ||
| Line 960: | Line 1,688: | ||
| [[Western Area: West]] | | [[Western Area: West]] | ||
|- | |- | ||
! scope="row"| +0 | ! scope="row"| +0 | ||
! scope="row"| +30 | ! scope="row"| +30 | ||
| Line 973: | Line 1,700: | ||
| [[Western Village]] <br> [[Silver Lake]] <br> [[Monster Card Lv3]] | | [[Western Village]] <br> [[Silver Lake]] <br> [[Monster Card Lv3]] | ||
|- | |- | ||
! scope="row"| +0 | ! scope="row"| +0 | ||
! scope="row"| +30 | ! scope="row"| +30 | ||
| Line 986: | Line 1,712: | ||
| [[Minato City]] | | [[Minato City]] | ||
|- | |- | ||
! scope="row"| +0 | ! scope="row"| +0 | ||
! scope="row"| +40 | ! scope="row"| +30 | ||
! scope="row"| +80 | ! scope="row"| +60 | ||
! scope="row"| +160 | ! scope="row"| +120 | ||
! scope="row"| +180 | |||
! scope="row"| +240 | |||
! scope="row"| +300 | |||
| [[File:Kabuterimon Icon.png|link=Kabuterimon]] | |||
| [[Kabuterimon]] | |||
| ❌ | |||
| Event | |||
|- | |||
! scope="row"| +0 | |||
! scope="row"| +30 | |||
! scope="row"| +60 | |||
! scope="row"| +120 | |||
! scope="row"| +180 | |||
! scope="row"| +240 | |||
! scope="row"| +300 | |||
| [[File:Frigimon Icon.png|link=Yukidarumon]] | |||
| [[Yukidarumon]] | |||
| ❌ | |||
| Event | |||
|- | |||
!+0 | |||
!+30 | |||
!+60 | |||
!+120 | |||
!+180 | |||
!+240 | |||
!+300 | |||
|[[File:Mikemon Icon.png]] | |||
|[[Mikemon]] | |||
|❌ | |||
|[[Shibuya]] | |||
|- | |||
!+0 | |||
!+30 | |||
!+60 | |||
!+120 | |||
!+180 | |||
!+240 | |||
!+300 | |||
|[[File:Peckmon Icon.png]] | |||
|[[Peckmon]] | |||
|❌ | |||
|Event | |||
|- | |||
!+0 | |||
!+30 | |||
!+60 | |||
!+120 | |||
!+180 | |||
!+240 | |||
!+300 | |||
|[[File:Angemon Icon.png]] | |||
|[[Angemon]] | |||
|❌ | |||
|Event | |||
|- | |||
!+0 | |||
!+30 | |||
!+60 | |||
!+120 | |||
!+180 | |||
!+240 | |||
!+300 | |||
|[[File:Gwappamon Icon.png]] | |||
|[[Gwappamon|Gawappamon]] | |||
|❌ | |||
|Event | |||
|- | |||
! scope="row"| +0 | |||
! scope="row"| +40 | |||
! scope="row"| +80 | |||
! scope="row"| +160 | |||
! scope="row"| +240 | ! scope="row"| +240 | ||
! scope="row"| +320 | ! scope="row"| +320 | ||
| Line 999: | Line 1,796: | ||
| [[Oil Refinery-1]] | | [[Oil Refinery-1]] | ||
|- | |- | ||
! scope="row"| +0 | ! scope="row"| +0 | ||
! scope="row"| +40 | ! scope="row"| +40 | ||
| Line 1,010: | Line 1,806: | ||
| [[SkullGreymon]] | | [[SkullGreymon]] | ||
| ❌ | | ❌ | ||
| [[Infinite Ice Wall]] <br> [[Dark Tower Wasteland]] <br> [[Monster Card Lv6]] | | [[Infinite Ice Wall]] <br>[[Dark Tower Wasteland]] <br>[[Monster Card Lv6]] | ||
|- | |- | ||
! scope="row"| +0 | ! scope="row"| +0 | ||
! scope="row"| +40 | ! scope="row"| +40 | ||
| Line 1,023: | Line 1,818: | ||
| [[WereGarurumon]] | | [[WereGarurumon]] | ||
| ❌ | | ❌ | ||
| [[Snowman Village]] <br> [[Monster Card Lv6]] | |[[Oil Refinery-1]] <br>[[Snowman Village]] <br>[[Monster Card Lv6]] | ||
|- | |||
! scope="row"| +0 | |||
! scope="row"| +40 | |||
! scope="row"| +80 | |||
! scope="row"| +160 | |||
! scope="row"| +240 | |||
! scope="row"| +320 | |||
! scope="row"| +400 | |||
| [[File:MachGaogamon Icon.png|link=MachGaogamon]] | |||
| [[MachGaogamon]] | |||
| ❌ | |||
| Event | |||
|- | |- | ||
! scope="row"| +0 | ! scope="row"| +0 | ||
! scope="row"| +50 | ! scope="row"| +50 | ||
| Line 1,038: | Line 1,844: | ||
| [[Infinite Ice Wall]] <br> [[Digimon Maze F4]] <br> [[Monster Card Lv7]] | | [[Infinite Ice Wall]] <br> [[Digimon Maze F4]] <br> [[Monster Card Lv7]] | ||
|- | |- | ||
! scope="row"| +0 | ! scope="row"| +0 | ||
! scope="row"| +60 | ! scope="row"| +50 | ||
! scope="row"| +120 | ! scope="row"| +100 | ||
! scope="row"| +240 | ! scope="row"| +200 | ||
! scope="row"| +360 | ! scope="row"| +300 | ||
! scope="row"| +480 | ! scope="row"| +400 | ||
! scope="row"| +600 | ! scope="row"| +500 | ||
| [[File:Zhuqiaomon (Mega) Icon.png|link=Zhuqiaomon]] | | [[File:Puppetmon Icon.png|link=Puppetmon]] | ||
| [[Zhuqiaomon]] | | [[Puppetmon]] | ||
| ❌ | | ❌ | ||
| [[Uprising Flame]] | | Event | ||
|- | |||
! scope="row"| +0 | |||
! scope="row"| +50 | |||
! scope="row"| +100 | |||
! scope="row"| +200 | |||
! scope="row"| +300 | |||
! scope="row"| +400 | |||
! scope="row"| +500 | |||
| [[File:Piedmon Icon.png|link=Piedmon]] | |||
| [[Piedmon]] | |||
| ❌ | |||
| Event | |||
|- | |||
!+0 | |||
!+50 | |||
!+100 | |||
!+200 | |||
!+300 | |||
!+400 | |||
!+500 | |||
|[[File:GrandisKuwagamon Icon.png|link=GrandisKuwagamon]] | |||
|[[GrandisKuwagamon]] | |||
|❌ | |||
|Event | |||
|- | |||
! scope="row"| +0 | |||
! scope="row"| +60 | |||
! scope="row"| +120 | |||
! scope="row"| +240 | |||
! scope="row"| +360 | |||
! scope="row"| +480 | |||
! scope="row"| +600 | |||
| [[File:Zhuqiaomon (Mega) Icon.png|link=Zhuqiaomon]] | |||
| [[Zhuqiaomon]] | |||
| ❌ | |||
| [[Uprising Flame]] (raid box) | |||
|- | |- | ||
! scope="row" colspan="2"| Maximum | ! scope="row" colspan="2"| Maximum | ||
| + | ! scope="row"| +8600 | ||
|} | |} | ||
==DE [Defense]== | ==DE [Defense]== | ||
{| class="wikitable" | {| class="wikitable" | ||
|- | |- | ||
| Line 1,072: | Line 1,910: | ||
! scope="col"| Drop Location | ! scope="col"| Drop Location | ||
|- | |- | ||
! scope="row"| +0 | ! scope="row"| +0 | ||
! scope="row"| +8 | ! scope="row"| +8 | ||
| Line 1,085: | Line 1,922: | ||
| [[Silver Lake]] | | [[Silver Lake]] | ||
|- | |- | ||
! scope="row"| +0 | ! scope="row"| +0 | ||
! scope="row"| +10 | ! scope="row"| +10 | ||
| Line 1,098: | Line 1,934: | ||
| [[Silver Lake]] | | [[Silver Lake]] | ||
|- | |- | ||
! scope="row"| +0 | ! scope="row"| +0 | ||
! scope="row"| +10 | ! scope="row"| +10 | ||
| Line 1,111: | Line 1,946: | ||
| [[Wilderness Area]] <br> [[Silent Forest]] <br> [[Digimon Maze F1]] <br> [[Datamon Maze]] <br> [[Monster Card Lv2]] | | [[Wilderness Area]] <br> [[Silent Forest]] <br> [[Digimon Maze F1]] <br> [[Datamon Maze]] <br> [[Monster Card Lv2]] | ||
|- | |- | ||
! scope="row"| +0 | ! scope="row"| +0 | ||
! scope="row"| +10 | ! scope="row"| +10 | ||
| Line 1,124: | Line 1,958: | ||
| [[Western Village]] <br> [[Western Area: East]] <br> [[Western Area: Outskirts]] <br> [[Wilderness Area]] <br> [[Frozen Ground]] <br> [[Monster Card Lv1]] | | [[Western Village]] <br> [[Western Area: East]] <br> [[Western Area: Outskirts]] <br> [[Wilderness Area]] <br> [[Frozen Ground]] <br> [[Monster Card Lv1]] | ||
|- | |- | ||
! scope="row"| +0 | ! scope="row"| +0 | ||
! scope="row"| + | ! scope="row"| +10 | ||
! scope="row"| + | ! scope="row"| +20 | ||
! scope="row"| +40 | |||
! scope="row"| +60 | ! scope="row"| +60 | ||
! scope="row"| + | ! scope="row"| +80 | ||
! scope="row"| + | ! scope="row"| +100 | ||
| [[File:Kamemon Icon.png|link=Kamemon]] | |||
| [[File: | | [[Kamemon]] | ||
| [[ | | ❌ | ||
| Event | |||
|- | |||
! +0 | |||
! +10 | |||
! +20 | |||
! +40 | |||
! +60 | |||
! +80 | |||
! +100 | |||
| [[File:Syakomon Icon.png]] | |||
| [[Syakomon]] | |||
| ❌ | |||
| [[Minato City]] | |||
|- | |||
! +0 | |||
! +10 | |||
! +20 | |||
! +40 | |||
! +60 | |||
! +80 | |||
! +100 | |||
| [[File:Palmon Icon.png]] | |||
| [[Palmon]] | |||
| ❌ | | ❌ | ||
| [[ | | [[Silver Lake]] <br> [[Lost Historic Site]] <br> [[Infinite Mountain]] | ||
|- | |||
!+0 | |||
!+10 | |||
!+20 | |||
!+40 | |||
!+60 | |||
!+80 | |||
!+100 | |||
|[[File:Event Seal Icon (Not official version).png|link=]] | |||
|Armor | |||
|❌ | |||
|Event | |||
|- | |- | ||
! scope="row"| +0 | ! scope="row"| +0 | ||
! scope="row"| +15 | ! scope="row"| +10 | ||
! scope="row"| +30 | ! scope="row"| +20 | ||
! scope="row"| +40 | |||
! scope="row"| +60 | |||
! scope="row"| +80 | |||
! scope="row"| +100 | |||
| [[File:Salamon Icon.png|link=Salamon]] | |||
| [[Salamon]] | |||
| ❌ | |||
| Event | |||
|- | |||
!+0 | |||
!+10 | |||
!+20 | |||
!+40 | |||
!+60 | |||
!+80 | |||
!+100 | |||
|[[File:PawnChessmon (White) Icon.png]] | |||
|[[PawnChessmon (White)|PawnChessmon W]] | |||
|❌ | |||
|Event | |||
|- | |||
! scope="row"| +0 | |||
! scope="row"| +15 | |||
! scope="row"| +30 | |||
! scope="row"| +60 | |||
! scope="row"| +90 | |||
! scope="row"| +120 | |||
! scope="row"| +150 | |||
| [[File:Flymon Icon.png|link=Flymon]] | |||
| [[Flymon]] | |||
| ❌ | |||
| [[Western Area: Outskirts]] <br> [[Server Continent Desert]] <br> [[Valley of Light]] <br> [[Monster Card Lv3]] | |||
|- | |||
! scope="row"| +0 | |||
! scope="row"| +15 | |||
! scope="row"| +30 | |||
! scope="row"| +60 | ! scope="row"| +60 | ||
! scope="row"| +90 | ! scope="row"| +90 | ||
| Line 1,150: | Line 2,054: | ||
| [[Western Area: East]] <br> [[Western Area: Outskirts]] <br> [[Wind Valley]] <br> [[Digimon Farm]] <br> [[Ruined Historic]] <br> [[Monster Card Lv4]] | | [[Western Area: East]] <br> [[Western Area: Outskirts]] <br> [[Wind Valley]] <br> [[Digimon Farm]] <br> [[Ruined Historic]] <br> [[Monster Card Lv4]] | ||
|- | |- | ||
! scope="row"| +0 | ! scope="row"| +0 | ||
! scope="row"| +15 | ! scope="row"| +15 | ||
| Line 1,163: | Line 2,066: | ||
| [[Silent Forest]] <br> [[Digimon Maze B2]] <br> [[Tokyo Tower]] <br> [[Monster Card Lv4]] | | [[Silent Forest]] <br> [[Digimon Maze B2]] <br> [[Tokyo Tower]] <br> [[Monster Card Lv4]] | ||
|- | |- | ||
! scope="row"| +0 | ! scope="row"| +0 | ||
! scope="row"| +15 | ! scope="row"| +15 | ||
| Line 1,171: | Line 2,073: | ||
! scope="row"| +120 | ! scope="row"| +120 | ||
! scope="row"| +150 | ! scope="row"| +150 | ||
| [[File: | | [[File:Rockmon Icon.png|link=Rockmon]] | ||
| [[Rockmon]] | | [[Rockmon]] | ||
| ❌ | | ❌ | ||
| [[Western Area: East]] <br> [[Digimon Maze Entrance]] <br> [[Server Continent Desert]] <br> [[Versandi Terminal]] | | [[Western Area: East]] <br> [[Digimon Maze Entrance]] <br> [[Server Continent Desert]] <br> [[Versandi Terminal]] | ||
|- | |- | ||
! scope="row"| +0 | ! scope="row"| +0 | ||
! scope="row"| +15 | ! scope="row"| +15 | ||
| Line 1,184: | Line 2,085: | ||
! scope="row"| +120 | ! scope="row"| +120 | ||
! scope="row"| +150 | ! scope="row"| +150 | ||
| [[File: | | [[File:Monochromon Icon.png|link=Monochromon]] | ||
| [[Monochromon]] | | [[Monochromon]] | ||
| ❌ | | ❌ | ||
| [[Versandi Terminal]] | | [[Versandi Terminal]] | ||
|- | |- | ||
! scope="row"| +0 | |||
! scope="row"| +15 | |||
! scope="row"| +30 | |||
! scope="row"| +60 | |||
! scope="row"| +90 | |||
! scope="row"| +120 | |||
! scope="row"| +150 | |||
| [[File:Ankylomon Icon.png|link=Ankylomon]] | |||
| [[Ankylomon]] | |||
| ❌ | |||
| Event | |||
|- | |||
! scope="row"| +0 | |||
! scope="row"| +15 | |||
! scope="row"| +30 | |||
! scope="row"| +60 | |||
! scope="row"| +90 | |||
! scope="row"| +120 | |||
! scope="row"| +150 | |||
| [[File:Shellmon Icon.png|link=Shellmon]] | |||
| [[Shellmon]] | |||
| ❌ | |||
| [[Rainbow Bridge]] | |||
|- | |||
!+0 | |||
!+15 | |||
!+30 | |||
!+60 | |||
!+90 | |||
!+120 | |||
!+150 | |||
|[[File:Thundermon Icon.png]] | |||
|[[Thunderballmon]] | |||
|❌ | |||
|Event | |||
|- | |||
!+0 | |||
!+15 | |||
!+30 | |||
!+60 | |||
!+90 | |||
!+120 | |||
!+150 | |||
|[[File:BaoHackmon Icon.png]] | |||
|[[BaoHackmon]] | |||
|❌ | |||
|Event | |||
|- | |||
! scope="row"| +0 | ! scope="row"| +0 | ||
! scope="row"| +20 | ! scope="row"| +20 | ||
| Line 1,202: | Line 2,150: | ||
| [[Oil Refinery-3]] <br> [[Digimon Maze F3]] <br> [[Server Continent Pyramid]] | | [[Oil Refinery-3]] <br> [[Digimon Maze F3]] <br> [[Server Continent Pyramid]] | ||
|- | |- | ||
! scope="row"| +0 | ! scope="row"| +0 | ||
! scope="row"| +20 | ! scope="row"| +20 | ||
| Line 1,213: | Line 2,160: | ||
| [[WaruMonzaemon]] | | [[WaruMonzaemon]] | ||
| ❌ | | ❌ | ||
| [[Digimon Farm]] <br> [[Digimon Maze B2]] <br> [[ | | [[Digimon Farm]] <br> [[Digimon Maze B2]] <br> [[Oil Refinery-1]] <br> [[Odaiba]] <br> [[Monster Card Lv5]] | ||
|- | |- | ||
! scope="row"| +0 | ! scope="row"| +0 | ||
! scope="row"| +20 | ! scope="row"| +20 | ||
| Line 1,228: | Line 2,174: | ||
| [[Shinjuku East Area (Night)]] | | [[Shinjuku East Area (Night)]] | ||
|- | |- | ||
! scope="row"| +0 | ! scope="row"| +0 | ||
! scope="row"| +25 | ! scope="row"| +25 | ||
| Line 1,239: | Line 2,184: | ||
| [[Chimairamon]] | | [[Chimairamon]] | ||
| ❌ | | ❌ | ||
| [[Kaiser's Laboratory]] <br> [[Monster Card Lv7]] | | [[Kaiser's Laboratory]] (pick up) <br> [[Monster Card Lv7]] | ||
|- | |- | ||
! scope="row"| +0 | ! scope="row"| +0 | ||
! scope="row"| +25 | ! scope="row"| +25 | ||
| Line 1,252: | Line 2,196: | ||
| [[Sleipmon]] | | [[Sleipmon]] | ||
| ❌ | | ❌ | ||
| [[Royal Base]] | | [[Royal Base]] (pick up) | ||
|- | |||
! scope="row"| +0 | |||
! scope="row"| +25 | |||
! scope="row"| +50 | |||
! scope="row"| +100 | |||
! scope="row"| +150 | |||
! scope="row"| +200 | |||
! scope="row"| +250 | |||
| [[File:HerculesKabuterimon Icon.png|link=HerculesKabuterimon]] | |||
| [[HerculesKabuterimon]] | |||
| ❌ | |||
| [[Infinite Ice Wall]] | |||
|- | |- | ||
! scope="row" colspan="2"| Maximum | ! scope="row" colspan="2"| Maximum | ||
! scope="row"| + | ! scope="row"| +3680 | ||
|} | |} | ||
==BL [Block Rate]== | ==BL [Block Rate]== | ||
{| class="wikitable" | {| class="wikitable" | ||
|- | |- | ||
| Line 1,275: | Line 2,228: | ||
! scope="col"| Drop Location | ! scope="col"| Drop Location | ||
|- | |- | ||
! scope="row"|+0% | ! scope="row"|+0% | ||
! scope="row"|+0.1% | ! scope="row"|+0.1% | ||
| Line 1,288: | Line 2,240: | ||
| [[Ancient Ruins of Secret]] <br> [[Versandi Terminal]] <br> [[Monster Card Lv2]] | | [[Ancient Ruins of Secret]] <br> [[Versandi Terminal]] <br> [[Monster Card Lv2]] | ||
|- | |- | ||
! scope="row"|+0% | ! scope="row"|+0% | ||
! scope="row"|+0.1% | ! scope="row"|+0.1% | ||
| Line 1,301: | Line 2,252: | ||
| [[Silver Lake]] <br> [[Frozen Ground]] <br> [[Monster Card Lv2]] | | [[Silver Lake]] <br> [[Frozen Ground]] <br> [[Monster Card Lv2]] | ||
|- | |- | ||
! scope="row"|+0% | ! scope="row"|+0% | ||
! scope="row"|+0. | ! scope="row"|+0.1% | ||
! scope="row"|+0. | ! scope="row"|+0.2% | ||
! scope="row"|+0.4% | |||
! scope="row"|+0.6% | ! scope="row"|+0.6% | ||
! scope="row"|+0.9% | ! scope="row"|+0.8% | ||
! scope="row"|+1.2% | ! scope="row"|+1% | ||
! scope="row"|+1.5% | | [[File:Agumon Icon.png|link=Agumon]] | ||
| [[File:Sangloupmon Icon.png|link=Sangloupmon]] | | [[Agumon]] (Starter) | ||
| [[Sangloupmon]] | | ❌ | ||
| Event | |||
|- | |||
!+0% | |||
!+0.1% | |||
!+0.2% | |||
!+0.4% | |||
!+0.6% | |||
!+0.8% | |||
!+1% | |||
|[[File:Falcomon Icon.png]] | |||
|[[Falcomon]] | |||
|❌ | |||
|Event | |||
|- | |||
!+0% | |||
!+0.1% | |||
!+0.2% | |||
!+0.4% | |||
!+0.6% | |||
!+0.8% | |||
!+1% | |||
|[[File:BlackGabumon Icon.png]] | |||
|[[BlackGabumon]] | |||
|❌ | |||
|Event | |||
|- | |||
!+0% | |||
!+0.1% | |||
!+0.2% | |||
!+0.4% | |||
!+0.6% | |||
!+0.8% | |||
!+1% | |||
|[[File:Event Seal Icon (Not official version).png|link=]] | |||
|Firm | |||
|❌ | |||
|Event | |||
|- | |||
! scope="row"|+0% | |||
! scope="row"|+0.1% | |||
! scope="row"|+0.2% | |||
! scope="row"|+0.4% | |||
! scope="row"|+0.6% | |||
! scope="row"|+0.8% | |||
! scope="row"|+1% | |||
| [[File:Gomamon Icon.png|link=Gomamon]] | |||
| [[Gomamon]] | |||
| ❌ | |||
| Event | |||
|- | |||
! scope="row"|+0% | |||
! scope="row"|+0.15% | |||
! scope="row"|+0.3% | |||
! scope="row"|+0.6% | |||
! scope="row"|+0.9% | |||
! scope="row"|+1.2% | |||
! scope="row"|+1.5% | |||
| [[File:Sangloupmon Icon.png|link=Sangloupmon]] | |||
| [[Sangloupmon]] | |||
| ❌ | | ❌ | ||
| [[Oil Refinery-3]] <br> [[Shibuya]] <br> [[Monster Card Lv3]] | | [[Oil Refinery-3]] <br> [[Shibuya]] <br> [[Monster Card Lv3]] | ||
|- | |- | ||
! scope="row"|+0% | ! scope="row"|+0% | ||
! scope="row"|+0.15% | ! scope="row"|+0.15% | ||
| Line 1,327: | Line 2,336: | ||
| [[Oil Refinery-2]] <br> [[Lost Historic Site]] <br> [[File Island Waterfront]] <br> [[Monster Card Lv3]] | | [[Oil Refinery-2]] <br> [[Lost Historic Site]] <br> [[File Island Waterfront]] <br> [[Monster Card Lv3]] | ||
|- | |- | ||
! scope="row"|+0% | ! scope="row"|+0% | ||
! scope="row"|+0.2% | ! scope="row"|+0.2% | ||
| Line 1,340: | Line 2,348: | ||
| [[Server Continent Desert]] <br> [[Server Continent Pyramid]] <br> [[Datamon Maze]] <br> [[Monster Card Lv6]] | | [[Server Continent Desert]] <br> [[Server Continent Pyramid]] <br> [[Datamon Maze]] <br> [[Monster Card Lv6]] | ||
|- | |- | ||
! scope="row"|+0% | ! scope="row"|+0% | ||
! scope="row"|+0.2% | ! scope="row"|+0.2% | ||
| Line 1,351: | Line 2,358: | ||
| [[MegaSeadramon]] | | [[MegaSeadramon]] | ||
| ✅ 1/1 Ticket | | ✅ 1/1 Ticket | ||
| [[Digimon Maze F3]] <br> [[File Island Waterfront]] <br> [[Scar of Water Crystal]] | | [[Digimon Maze F3]] <br> [[File Island Waterfront]] <br> [[Scar of Water Crystal]] (pick up) | ||
|- | |- | ||
! scope="row"|+0% | ! scope="row"|+0% | ||
! scope="row"|+0.2% | ! scope="row"|+0.2% | ||
| Line 1,366: | Line 2,372: | ||
| [[Oil Refinery-3]] | | [[Oil Refinery-3]] | ||
|- | |- | ||
!+0% | |||
! scope="row" colspan="2"| Maximum | !+0.2% | ||
| + | !+0.4% | ||
!+0.8% | |||
!+1.2% | |||
!+1.6% | |||
!+2% | |||
| [[File:TankDramon_Icon.png|link=TankDramon]] | |||
| [[TankDramon]] | |||
| ❌ | |||
| [[Big Sight]] | |||
|- | |||
!+0% | |||
!+0.2% | |||
!+0.4% | |||
!+0.8% | |||
!+1.2% | |||
!+1.6% | |||
!+2% | |||
|[[File:Shakkoumon Icon.png]] | |||
|[[Shakkoumon]] | |||
|❌ | |||
|Event | |||
|- | |||
!+0% | |||
!+0.2% | |||
!+0.4% | |||
!+0.8% | |||
!+1.2% | |||
!+1.6% | |||
!+2% | |||
|[[File:Lilamon Icon.png]] | |||
|[[Lilamon]] | |||
|❌ | |||
|Event | |||
|- | |||
!+0% | |||
!+0.25% | |||
!+0.5% | |||
!+1% | |||
!+1.5% | |||
!+2% | |||
!+2.5% | |||
| [[File:ShineGreymon Icon.png|link=ShineGreymon]] | |||
| [[ShineGreymon]] | |||
| ❌ | |||
| Event | |||
|- | |||
! scope="row"|+0% | |||
! scope="row"|+0.35% | |||
! scope="row"|+0.7% | |||
! scope="row"|+1.4% | |||
! scope="row"|+2.1% | |||
! scope="row"|+2.8% | |||
! scope="row"|+3.5% | |||
| [[File:Fanglongmon Icon.png|link=Fanglongmon]] | |||
| [[Fanglongmon]] | |||
| ❌ | |||
| Event | |||
|- | |||
!+0% | |||
!+0.4% | |||
!+0.8% | |||
!+1.6% | |||
!+2.4% | |||
!+3.2% | |||
!+4% | |||
|[[File:Gallantmon (Crimson Mode) Icon.png|link=Gallantmon (Crimson Mode)]] | |||
|[[Gallantmon (Crimson Mode)]] | |||
|❌ | |||
|Event | |||
|- | |||
! colspan="2" scope="row" | Maximum | |||
! scope="row" | +32% | |||
|} | |} | ||
==EV [Evade Rate]== | ==EV [Evade Rate]== | ||
{| class="wikitable" | {| class="wikitable" | ||
|- | |- | ||
| Line 1,387: | Line 2,462: | ||
! scope="col"| Drop Location | ! scope="col"| Drop Location | ||
|- | |- | ||
! scope="row"|+0% | ! scope="row"|+0% | ||
! scope="row"|+0.2% | ! scope="row"|+0.2% | ||
| Line 1,400: | Line 2,474: | ||
| [[Western Village]] | | [[Western Village]] | ||
|- | |- | ||
! scope="row"|+0% | ! scope="row"|+0% | ||
! scope="row"|+0.2% | ! scope="row"|+0.2% | ||
| Line 1,413: | Line 2,486: | ||
| [[Western Village]] | | [[Western Village]] | ||
|- | |- | ||
! scope="row"|+0% | |||
! scope="row"|+0.2% | |||
! scope="row"|+0.2% | |||
! scope="row"|+0.4% | |||
! scope="row"|+0.6% | |||
! scope="row"|+0.8% | |||
! scope="row"|+1% | |||
| [[File:Event Seal Icon (Not official version).png|link=]] | |||
| Seal of Coolness | |||
| ❌ | |||
| Event | |||
|- | |||
!+0% | |||
!+0.15% | |||
!+0.3% | |||
!+0.6% | |||
!+0.9% | |||
!+1.2% | |||
!+1.5% | |||
|[[File:Hagurumon Icon.png|link=Hagurumon]] | |||
|[[Hagurumon]] | |||
|❌ | |||
|Event | |||
|- | |||
! scope="row"|+0% | ! scope="row"|+0% | ||
! scope="row"|+0.2% | ! scope="row"|+0.2% | ||
| Line 1,426: | Line 2,522: | ||
| [[Western Village]] <br> [[Lost Historic Site]] | | [[Western Village]] <br> [[Lost Historic Site]] | ||
|- | |- | ||
! scope="row"|+0% | ! scope="row"|+0% | ||
! scope="row"|+0.2% | ! scope="row"|+0.2% | ||
| Line 1,439: | Line 2,534: | ||
| [[Oil Refinery-2]] <br> [[Monster Card Lv3]] | | [[Oil Refinery-2]] <br> [[Monster Card Lv3]] | ||
|- | |- | ||
! scope="row"|+0% | ! scope="row"|+0% | ||
! scope="row"|+0.2% | ! scope="row"|+0.2% | ||
| Line 1,452: | Line 2,546: | ||
| [[Digimon Farm]] | | [[Digimon Farm]] | ||
|- | |- | ||
! scope="row"|+0% | ! scope="row"|+0% | ||
! scope="row"|+0.2% | ! scope="row"|+0.2% | ||
| Line 1,465: | Line 2,558: | ||
| [[Versandi Terminal]] | | [[Versandi Terminal]] | ||
|- | |- | ||
! scope="row"|+0% | ! scope="row"|+0% | ||
! scope="row"|+0.2% | ! scope="row"|+0.2% | ||
| Line 1,478: | Line 2,570: | ||
| [[Shinjuku Western Area (Night)]] | | [[Shinjuku Western Area (Night)]] | ||
|- | |- | ||
!+0% | |||
!+0.2% | |||
!+0.4% | |||
!+0.8% | |||
!+1.2% | |||
!+1.6% | |||
!+2% | |||
|[[File:Yasyamon_Icon.png|link=Yasyamon]] | |||
|[[Yasyamon]] | |||
| ❌ | |||
|[[Odaiba]] | |||
|- | |||
!+0% | |||
!¨+0.2% | |||
!+0.4% | |||
!+0.8% | |||
!+1.2% | |||
!+1.6% | |||
!+2% | |||
|[[File:BlackGatomon Icon.png]] | |||
|[[BlackGatomon]] | |||
|❌ | |||
|[[Shibuya]] | |||
|- | |||
! scope="row"|+0% | ! scope="row"|+0% | ||
! scope="row"|+0.3% | ! scope="row"|+0.3% | ||
| Line 1,491: | Line 2,606: | ||
| [[Silver Lake]] <br> [[Versandi Terminal]] | | [[Silver Lake]] <br> [[Versandi Terminal]] | ||
|- | |- | ||
! scope="row"|+0% | ! scope="row"|+0% | ||
! scope="row"|+0.3% | ! scope="row"|+0.3% | ||
| Line 1,504: | Line 2,618: | ||
| [[Lost Historic Site]] | | [[Lost Historic Site]] | ||
|- | |- | ||
! scope="row"|+0% | ! scope="row"|+0% | ||
! scope="row"|+0.3% | ! scope="row"|+0.3% | ||
| Line 1,515: | Line 2,628: | ||
| [[NeoDevimon]] | | [[NeoDevimon]] | ||
| ❌ | | ❌ | ||
| [[Oil Refinery-3]] <br> [[File Island Waterfront]] <br> [[Monster Card Lv5]] | | [[Oil Refinery-3]] <br> [[File Island Waterfront]] <br> [[Big Sight]] <br> [[Monster Card Lv5]] | ||
|- | |- | ||
! scope="row"|+0% | ! scope="row"|+0% | ||
! scope="row"|+0. | ! scope="row"|+0.3% | ||
! scope="row"|+0. | ! scope="row"|+0.6% | ||
! scope="row"|+1. | ! scope="row"|+1.2% | ||
! scope="row"|+ | ! scope="row"|+1.8% | ||
! scope="row"|+2. | ! scope="row"|+2.4% | ||
! scope="row"|+3 | ! scope="row"|+3% | ||
| [[File: | | [[File:Rapidmon Icon.png|link=Rapidmon]] | ||
| [[ | | [[Rapidmon]] | ||
| ❌ | | ❌ | ||
| [[ | | [[File Island Waterfront]] | ||
|- | |- | ||
! scope="row"|+0% | ! scope="row"|+0% | ||
! scope="row"|+0. | ! scope="row"|+0.3% | ||
! scope="row"|+0. | ! scope="row"|+0.6% | ||
! scope="row"|+1. | ! scope="row"|+1.2% | ||
! scope="row"|+ | ! scope="row"|+1.8% | ||
! scope="row"|+2. | ! scope="row"|+2.4% | ||
! scope="row"|+3 | ! scope="row"|+3% | ||
| [[File: | | [[File:SaviorHackmon Icon.png|link=SaviorHackmon]] | ||
| [[ | | [[SaviorHackmon]] | ||
| ❌ | | ❌ | ||
| Event | | Event | ||
|- | |- | ||
! scope="row"|+0% | |||
! scope="row" colspan="2"| Maximum | ! scope="row"|+0.3% | ||
! scope="row"| + | ! scope="row"|+0.6% | ||
|} | ! scope="row"|+1.2% | ||
! scope="row"|+1.8% | |||
! scope="row"|+2.4% | |||
! scope="row"|+3% | |||
| [[File:MegaKabuterimon Icon.png|link=MegaKabuterimon]] | |||
| [[MegaKabuterimon]] | |||
| ❌ | |||
| [[Distorted Data Village]] | |||
|- | |||
! scope="row"|+0% | |||
! scope="row"|+0.35% | |||
! scope="row"|+0.7% | |||
! scope="row"|+1.4% | |||
! scope="row"|+2.1% | |||
! scope="row"|+2.8% | |||
! scope="row"|+3.5% | |||
| [[File:Dynasmon Icon.png|link=Dynasmon]] | |||
| [[Dynasmon]] | |||
| ❌ | |||
| [[Royal Base]] (pick up) | |||
|- | |||
! scope="row"|+0% | |||
! scope="row"|+0.35% | |||
! scope="row"|+0.7% | |||
! scope="row"|+1.4% | |||
! scope="row"|+2.1% | |||
! scope="row"|+2.8% | |||
! scope="row"|+3.5% | |||
| [[File:DexDorugoramon Icon.png|link=DexDorugoramon]] | |||
| [[DexDorugoramon]] | |||
| ❌ | |||
| Event | |||
|- | |||
! scope="row"|+0% | |||
! scope="row"|+0.35% | |||
! scope="row"|+0.7% | |||
! scope="row"|+1.4% | |||
! scope="row"|+2.1% | |||
! scope="row"|+2.8% | |||
! scope="row"|+3.5% | |||
| [[File:Bokomon Icon.png|link=Bokomon]] | |||
| [[Bokomon]] | |||
| ❌ | |||
| Event | |||
|- | |||
! scope="row"|+0% | |||
! scope="row"|+0.35% | |||
! scope="row"|+0.7% | |||
! scope="row"|+1.4% | |||
! scope="row"|+2.1% | |||
! scope="row"|+2.8% | |||
! scope="row"|+3.5% | |||
| [[File:MirageGaogamon Icon.png|link=MirageGaogamon]] | |||
| [[MirageGaogamon]] | |||
| ❌ | |||
| Event | |||
|- | |||
!+0% | |||
!+0.35% | |||
!+0.7% | |||
!+1.4% | |||
!+2.1% | |||
!+2.8% | |||
!+3.5% | |||
|[[File:Ravemon Icon.png]] | |||
|[[Ravemon]] | |||
|❌ | |||
|Event | |||
|- | |||
!+0% | |||
!+0.4% | |||
!+0.8% | |||
!+1.6% | |||
!+2.4% | |||
!+3.2% | |||
!+4% | |||
|[[File:Rosemon (Burst Mode) Icon.png]] | |||
|[[Rosemon (Burst Mode)]] | |||
|❌ | |||
|Event | |||
|- | |||
!+0% | |||
!+0.4% | |||
!+0.8% | |||
!+1.6% | |||
!+2.4% | |||
!+3.2% | |||
!+4% | |||
|[[File:Marsmon Icon.png]] | |||
|[[Marsmon]] | |||
|❌ | |||
|Event | |||
|- | |||
! colspan="2" scope="row" | Maximum | |||
! scope="row" | +62% | |||
|} | |||
{{system}} | {{system}} | ||
Latest revision as of 22:28, 29 March 2024
![]() Angemon Seal
Angemon Seal
ClassRare item Item
Right-click to use Seal Opener to be activated so as to get the buff according to the number of the seal while hunting.
- Seals are items dropped by certain Digimon that can be used in Seal Master System.
- Seal ability applies to the summoned digimon as passive stats.
- Digimon seals have various abilities by type, increasing status in many ways.
- Seals increase normal attack damage, defense, block rate, evasion, hit rate, critical, HP and DS.
- The more various seals you collect, and the more levels you raise, the more various and stronger abilities your digimon will gain permanently.
![]() Seal Opener - Can open the Seal Card on Seal Master System UI.
Seal Opener - Can open the Seal Card on Seal Master System UI.
![]() Seal Closer - Can make the Seal Cards tradable again.
Seal Closer - Can make the Seal Cards tradable again.
- Both are obtained from Cash Shop, Server Reward, events or buying from another player.
- Amount of Seal Card & Seal Opener required.
| First Level | Second Level | Third Level | Fourth Level | Fifth Level | Last Level |
| Normal Card | Bronze Card | Silver Card | Gold Card | Platinum Card | Master Card |
 |
 |
 |
 |
 |

|
| 1~49 Seal cards | 50~199 Seal cards | 200~499 Seal cards | 500~999 Seal cards | 1000~2999 Seal cards | 3.000 Seal cards |
| 1 Seal Opener | 1+ Seal Opener | 4+ Seal Opener | 10+ Seal Opener | 20+ Seal Opener | 60 Seal Opener |
Royal Base Hard Seal 150ea
| |||||
| 1~9 | 10~29 | 30~49 | 50~?? | ||
- 1 Seal Opener/Closer can be used on 50 Seals.
- The same amount of Seal Closer is needed to make it tradable.
- It is possible to have multiple Digimon Seals
- User interface of Seal Master
- When you click the button below you get access to the Seal Master or pressing the keyboard key T

- This is Seal Master UI
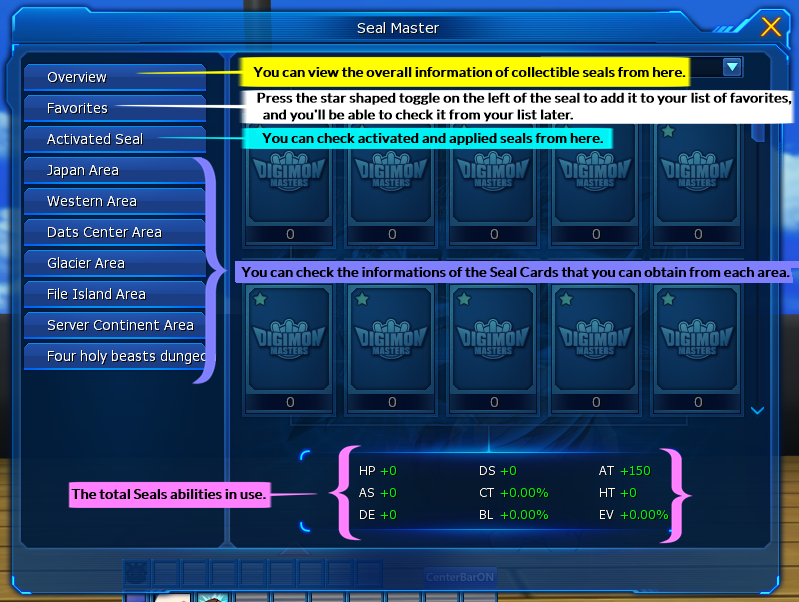
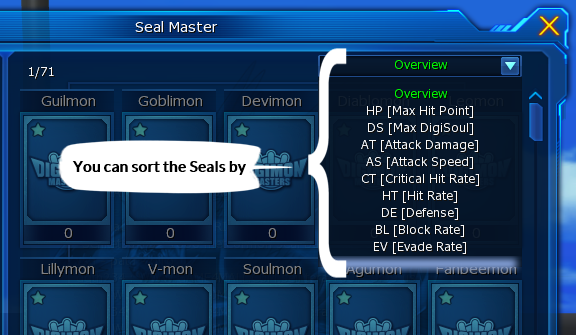
When you reach a Master Seal of a digimon, you can use it as a pet, a right-click above of Seal Masters to appoint leader.
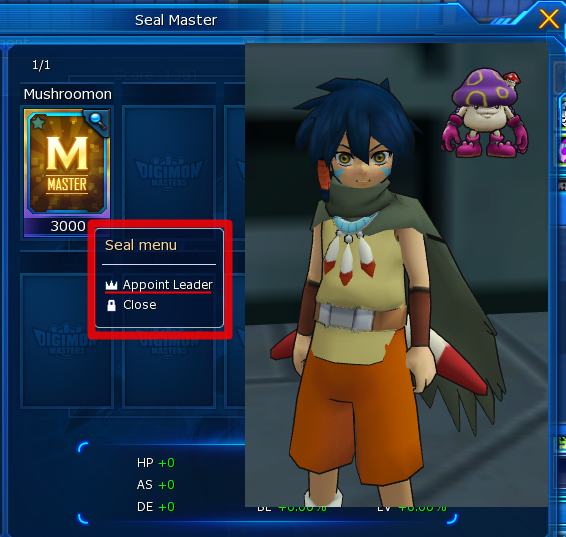
- Digimon which have Seal and its abilities.
AT [Attack Damage]
| Unopened | Normal | Bronze | Silver | Gold | Platinum | Master | Digimon | Digimon Name | Seal Exchange | Drop Location |
|---|---|---|---|---|---|---|---|---|---|---|
| +0 | +10 | +20 | +40 | +60 | +80 | +100 | Tanemon | ✅ 10/1 Ticket | Silver Lake | |
| +0 | +15 | +30 | +60 | +90 | +120 | +150 | Guilmon | ❌ | Snowstorm Village Frozen Ground Monster Card Lv1 | |
| +0 | +15 | +30 | +60 | +90 | +120 | +150 | Patamon | ❌ | Silver Lake Western Area: East Monster Card Lv1 | |
| +0 | +15 | +30 | +60 | +90 | +120 | +150 | Mushroomon | ❌ | Western Village Silver Lake Versandi Terminal Monster Card Lv2 | |
| +0 | +15 | +30 | +60 | +90 | +120 | +150 | Monodramon | ❌ | D-Terminal-Dungeon-B2 | |
| +0 | +15 | +30 | +60 | +90 | +120 | +150 | PicoDevimon | ❌ | Event | |
| +0 | +15 | +30 | +60 | +90 | +120 | +150 | Passionate | ❌ | Event | |
| +0 | +15 | +30 | +60 | +90 | +120 | +150 | Environment | ❌ | Event | |
| +0 | +20 | +40 | +80 | +120 | +160 | +200 | BlackGarurumon | ✅ 5/1 Ticket | ||
| +0 | +20 | +40 | +80 | +120 | +160 | +200 | Chrysalimon | ✅ 5/1 Ticket | Digimon Maze F2 Snowstorm Village | |
| +0 | +20 | +40 | +80 | +120 | +160 | +200 | Devimon | ❌ | Wilderness Area Silent Forest Crack of Devimon (Instance Dungeon) Monster Card Lv4 | |
| +0 | +20 | +40 | +80 | +120 | +160 | +200 | Greymon | ❌ | Western Area: East Server Continent Desert Event | |
| +0 | +20 | +40 | +80 | +120 | +160 | +200 | ExV-mon | ❌ | Event | |
| +0 | +25 | +50 | +100 | +150 | +200 | +250 | Giromon | ❌ | Digimon Maze B2 File Island Waterfront Odaiba Monster Card Lv6 | |
| +0 | +25 | +50 | +100 | +150 | +200 | +250 | Cherrymon | ❌ | Silver Lake Lost Historic Site Server Continent Canyon Monster Card Lv5 | |
| +0 | +25 | +50 | +100 | +150 | +200 | +250 | MarineDevimon | ❌ | Scar of Water Crystal (pick up) Monster Card Lv6 | |
| +0 | +25 | +50 | +100 | +150 | +200 | +250 | Myotismon | ❌ | Shibuya (raid box) Minato City (raid box) Big Sight (raid box) Fuji TV Rooftop (raid box) | |
| +0 | +25 | +50 | +100 | +150 | +200 | +250 | Culumon | ❌ | Event | |
| +0 | +25 | +50 | +100 | +150 | +200 | +250 | Orochimon | ❌ | PawnChessmon B Item Craft (D-Terminal) | |
| +0 | +25 | +50 | +100 | +150 | +200 | +250 | Silphymon | ❌ | Event | |
| +0 | +30 | +60 | +120 | +180 | +240 | +300 | Qinglongmon | ❌ | Descending Thunder God (raid box) | |
| +0 | +30 | +60 | +120 | +180 | +240 | +300 | Examon | ❌ | Versandi Terminal (raid reward) Royal Base (pick up) | |
| +0 | +30 | +60 | +120 | +180 | +240 | +300 | Omegamon | ❌ | Versandi Terminal (raid reward, rank 1 only) | |
| +0 | +30 | +60 | +120 | +180 | +240 | +300 | Dexmon | ❌ | Royal Base (pick up) | |
| +0 | +30 | +60 | +120 | +180 | +240 | +300 | VenomMyotismon | ❌ | Venomous Vortex (raid box) | |
| +0 | +30 | +60 | +120 | +180 | +240 | +300 | Megidramon | ❌ | PawnChessmon B Item Craft (Shinjuku)
Event | |
| +0 | +30 | +60 | +120 | +180 | +240 | +300 | 10th Year Anniversary | ❌ | Event | |
| +0 | +30 | +60 | +120 | +180 | +240 | +300 | 11th Year Anniversary | ❌ | Event | |
| +0 | +30 | +60 | +120 | +180 | +240 | +300 | Machinedramon | ❌ | Event | |
| +0 | +30 | +60 | +120 | +180 | +240 | +300 | Chaosmon | ❌ | Event | |
| +0 | +30 | +60 | +120 | +180 | +240 | +300 | MirageGaogamon (Burst Mode) | ❌ | Event | |
| +0 | +30 | +60 | +120 | +180 | +240 | +300 | Boltboutamon | ❌ | Event | |
| +0 | +30 | +60 | +120 | +180 | +240 | +300 | Alphamon | ❌ | Event | |
| +0 | +30 | +60 | +120 | +180 | +240 | +300 | Imperialdramon | ❌ | Event | |
| +0 | +30 | +60 | +120 | +180 | +240 | +300 | Kuzuhamon | ❌ | Event | |
| Maximum | +8400 | |||||||||
CT [Critical Hit Rate]
| Unopened | Normal | Bronze | Silver | Gold | Platinum | Master | Digimon | Digimon Name | Seal Exchange | Drop Location |
|---|---|---|---|---|---|---|---|---|---|---|
| +0% | +0.1% | +0.2% | +0.4% | +0.6% | +0.8% | +1% | Koromon | ✅ 10/1 Ticket | Yokohama Village Silver Lake | |
| +0% | +0.1% | +0.2% | +0.4% | +0.6% | +0.8% | +1% | PawnChessmon B | ❌ | Event | |
| +0% | +0.15% | +0.3% | +0.6% | +0.9% | +1.2% | +1.5% | Kunemon | ✅ 10/1 Ticket | Yokohama Village Silver Lake Versandi Terminal | |
| +0% | +0.15% | +0.3% | +0.6% | +0.9% | +1.2% | +1.5% | Sharmamon | ✅ 10/1 Ticket | Silent Forest | |
| +0% | +0.15% | +0.3% | +0.6% | +0.9% | +1.2% | +1.5% | CommanDramon | ❌ | Big Sight | |
| +0% | +0.15% | +0.3% | +0.6% | +0.9% | +1.2% | +1.5% | Lalamon | ❌ | Event | |
| +0% | +0.15% | +0.3% | +0.6% | +0.9% | +1.2% | +1.5% | Conversion | ❌ | Event | |
| +0% | +0.15% | +0.3% | +0.6% | +0.9% | +1.2% | +1.5% | Hope | ❌ | Event | |
| +0% | +0.2% | +0.4% | +0.8% | +1.2% | +1.6% | +2% | Kyuubimon | ❌ | Oil Refinery-1 Oil Refinery-2 Oil Refinery-3 Wilderness Area Wind Valley Dark Tower Wasteland Digimon Farm Ruined Historic Western Area: West Monster Card Lv4 | |
| +0% | +0.2% | +0.4% | +0.8% | +1.2% | +1.6% | +2% | Togemon | ✅ 5/1 Ticket | Western Village | |
| +0% | +0.2% | +0.4% | +0.8% | +1.2% | +1.6% | +2% | Tylomon | ❌ | Minato City | |
| +0% | +0.2% | +0.4% | +0.8% | +1.2% | +1.6% | +2% | Gaogamon | ❌ | Event | |
| +0% | +0.25% | +0.5% | +1.0% | +1.5% | +2.0% | +2.5% | Datamon | ❌ | Datamon Maze (pick up) Versandi Terminal | |
| +0% | +0.25% | +0.5% | +1.0% | +1.5% | +2.0% | +2.5% | Volcamon | ✅ 1/1 Ticket | Digimon Maze Entrance Server Continent Pyramid | |
| +0% | +0.25% | +0.5% | +1.0% | +1.5% | +2.0% | +2.5% | Vajiramon | ❌ | Stadium | |
| +0% | +0.25% | +0.5% | +1.0% | +1.5% | +2.0% | +2.5% | RizeGreymon | ❌ | Event | |
| +0% | +0.25% | +0.5% | +1.0% | +1.5% | +2.0% | +2.5% | Phantomon | ❌ | Event | |
| +0% | +0.25% | +0.5% | +1.0% | +1.5% | +2.0% | +2.5% | MagnaAngemon | ❌ | Event | |
| +0% | +0.3% | +0.6% | +1.2% | +1.8% | +2.4% | +3% | SaberLeomon | ❌ | Oil Refinery-3 Infinite Ice Wall Monster Card Lv7 | |
| +0% | +0.3% | +0.6% | +1.2% | +1.8% | +2.4% | +3% | MetalGarurumon | ❌ | Distorted Data Village | |
| +0% | +0.3% | +0.6% | +1.2% | +1.8% | +2.4% | +3% | Jesmon | ❌ | Event | |
| +0% | +0.35% | +0.7% | +1.4% | +2.1% | +2.8% | +3.5% | ChaosPiedmon | ❌ | Event | |
| +0% | +0.35% | +0.7% | +1.4% | +2.1% | +2.8% | +3.5% | PrinceMamemon | ❌ | Event | |
| +0% | +0.35% | +0.7% | +1.4% | +2.1% | +2.8% | +3.5% | Ravemon (Burst Mode) | ❌ | Event | |
| +0% | +0.35% | +0.7% | +1.4% | +2.1% | +2.8% | +3.5% | ShadowSeraphimon | ❌ | Event | |
| +0% | +0.4% | +0.8% | +1.6% | +2.4% | +3.2% | +4% | Omegamon Zwart | ❌ | Event | |
| +0% | +0.4% | +0.8% | +1.6% | +2.4% | +3.2% | +4% | Shoutmon X2 | ❌ | Event | |
| Maximum | +65.0% | |||||||||
HT [Hit Rate]
| Unopened | Normal | Bronze | Silver | Gold | Platinum | Master | Digimon | Digimon Name | Seal Exchange | Drop Location |
|---|---|---|---|---|---|---|---|---|---|---|
| +0 | +10 | +20 | +40 | +60 | +80 | +100 | Drimogemon | ❌ | Yokohama Village Server Continent Desert Monster Card Lv1 | |
| +0 | +10 | +20 | +40 | +60 | +80 | +100 | FanBeemon | ✅ 10/1 Ticket | Server Continent Desert Versandi Terminal | |
| +0 | +10 | +20 | +40 | +60 | +80 | +100 | Gabumon | ❌ | Snowstorm Village Shadow Labyrinth | |
| +0 | +10 | +20 | +40 | +60 | +80 | +100 | Floramon | ❌ | PawnChessmon B Item Craft (D-Terminal) | |
| +0 | +10 | +20 | +40 | +60 | +80 | +100 | Hackmon | ❌ | Event | |
| +0 | +10 | +20 | +40 | +60 | +80 | +100 | Seal of Marksman | ❌ | Event | |
| +0 | +10 | +20 | +40 | +60 | +80 | +100 | Exploration Seal | ❌ | Event | |
| +0 | +20 | +40 | +80 | +120 | +160 | +200 | Coredramon (Blue) | ✅ 5/1 Ticket | Western Area: West | |
| +0 | +20 | +40 | +80 | +120 | +160 | +200 | Dorugamon | ✅ 5/1 Ticket | Oil Refinery-1 | |
| +0 | +20 | +40 | +80 | +120 | +160 | +200 | DarkTyrannomon | ❌ | Versandi Terminal | |
| +0 | +20 | +40 | +80 | +120 | +160 | +200 | Witchmon | ❌ | Minato City | |
| +0 | +20 | +40 | +80 | +120 | +160 | +200 | GeoGreymon | ❌ | Event | |
| +0 | +30 | +60 | +120 | +180 | +240 | +300 | Garudamon | ✅ 1/1 Ticket | Ruined Historic Uprising Flame (pick up) | |
| +0 | +30 | +60 | +120 | +180 | +240 | +300 | Knightmon | ❌ | Oil Refinery-1 Digimon Maze B1 Secret Ancient Ruins Odaiba Monster Card Lv5 | |
| +0 | +30 | +60 | +120 | +180 | +240 | +300 | BlackWereGarurumon | ❌ | Odaiba | |
| +0 | +30 | +60 | +120 | +180 | +240 | +300 | Crowmon | ❌ | Event | |
| +0 | +30 | +60 | +120 | +180 | +240 | +300 | MetalGreymon | ❌ | Western Area: West Ruined Historic | |
| +0 | +30 | +60 | +120 | +180 | +240 | +300 | Antylamon | ❌ | Event | |
| +0 | +30 | +60 | +120 | +180 | +240 | +300 | Blossomon | ❌ | Event | |
| +0 | +40 | +80 | +160 | +240 | +320 | +400 | Parasimon | ❌ | Secret Ancient Ruins Monster Card Lv7 | |
| +0 | +40 | +80 | +160 | +240 | +320 | +400 | LordKnightmon | ❌ | Royal Base (pick up) | |
| +0 | +40 | +80 | +160 | +240 | +320 | +400 | Beelzemon | ❌ | Event | |
| +0 | +40 | +80 | +160 | +240 | +320 | +400 | Rosemon | ❌ | Event | |
| +0 | +50 | +100 | +200 | +300 | +400 | +500 | Baihumon | ❌ | Trace of Black Steel (raid box) | |
| +0 | +50 | +100 | +200 | +300 | +400 | +500 | Craniamon | ❌ | Royal Base (pick up) | |
| +0 | +50 | +100 | +200 | +300 | +400 | +500 | TyrantKabuterimon | ❌ | Event | |
| +0 | +50 | +100 | +200 | +300 | +400 | +500 | Belial Vamdemon | ❌ | Event | |
| +0 | +55 | +110 | +220 | +330 | +440 | +550 | Apocalymon | ❌ | Event | |
| Maximum | +7900 | |||||||||
HP [Health Points]
| Unopened | Normal | Bronze | Silver | Gold | Platinum | Master | Digimon | Digimon Name | Seal Exchange | Drop Location |
|---|---|---|---|---|---|---|---|---|---|---|
| +0 | +15 | +30 | +60 | +90 | +120 | +150 | Gazimon | ❌ | Server Continent Desert Server Continent Canyon Server Continent Pyramid Datamon Maze | |
| +0 | +15 | +30 | +60 | +90 | +120 | +150 | Keramon | ❌ | Digimon Maze F1 D-Terminal-Dungeon-B2 Yokohama Village Monster Card Lv2 | |
| +0 | +15 | +30 | +60 | +90 | +120 | +150 | Tsunomon | ✅ 10/1 Ticket | Silver Lake | |
| +0 | +15 | +30 | +60 | +90 | +120 | +150 | Veemon | ❌ | Dark Tower Wasteland Monster Card Lv1 | |
| +0 | +15 | +30 | +60 | +90 | +120 | +150 | Gaomon | ❌ | Event | |
| +0 | +15 | +30 | +60 | +90 | +120 | +150 | Grow Well | ❌ | Event | |
| +0 | +20 | +40 | +80 | +120 | +160 | +200 | Guardromon | ✅ 5/1 Ticket | Digimon Maze B1 Oil Refinery-2 | |
| +0 | +20 | +40 | +80 | +120 | +160 | +200 | Kentarumon | ❌ | Secret Ancient Ruins (pick up) Monster Card Lv4 | |
| +0 | +20 | +40 | +80 | +120 | +160 | +200 | Soulmon | ✅ 5/1 Ticket | Digimon Maze F2 Silent Forest Valley of Light Shibuya | |
| +0 | +20 | +40 | +80 | +120 | +160 | +200 | ReptileDramon | ❌ | Versandi Terminal | |
| +0 | +20 | +40 | +80 | +120 | +160 | +200 | Raremon (Champion) | ❌ | Shibuya | |
| +0 | +20 | +40 | +80 | +120 | +160 | +200 | Ikkakumon | ❌ | Frozen Ground | |
| +0 | +20 | +40 | +80 | +120 | +160 | +200 | SunFlowmon | ❌ | Event | |
| +0 | +20 | +40 | +80 | +120 | +160 | +200 | Garurumon | ❌ | Wind Valley Snowstorm Village | |
| +0 | +20 | +40 | +80 | +120 | +160 | +200 | Ogremon | ❌ | Event | |
| +0 | +25 | +50 | +100 | +150 | +200 | +250 | Sinduramon | ❌ | D-Terminal-Dungeon-B2 Oil Refinery-2 Monster Card Lv5 | |
| +0 | +25 | +50 | +100 | +150 | +200 | +250 | SkullSatamon | ✅ 1/1 Ticket | Oil Refinery-1 File Island Waterfront | |
| +0 | +25 | +50 | +100 | +150 | +200 | +250 | Whamon | ❌ | Event | |
| +0 | +30 | +60 | +120 | +180 | +240 | +300 | DexDoruGreymon | ❌ | Oil Refinery-3 Versandi Terminal Monster Card Lv7 | |
| +0 | +40 | +80 | +160 | +240 | +320 | +400 | Sakuyamon | ❌ | Event | |
| +0 | +50 | +100 | +200 | +300 | +400 | +500 | Ebonwumon | ❌ | Scar of Water Crystal (raid box) | |
| +0 | +50 | +100 | +200 | +300 | +400 | +500 | UlforceVeedramon | ❌ | Royal Base (pick up) | |
| +0 | +50 | +100 | +200 | +300 | +400 | +500 | WarGreymon | ❌ | Dark Tower Wasteland | |
| +0 | +50 | +100 | +200 | +300 | +400 | +500 | Lucemon (Satan Mode) | ❌ | Event | |
| +0 | +50 | +100 | +200 | +300 | +400 | +500 | BanchouLeomon | ❌ | Event | |
| +0 | +50 | +100 | +200 | +300 | +400 | +500 | MetalSeadramon | ❌ | Marine Dragon Domain | |
| +0 | +55 | +110 | +220 | +330 | +440 | +550 | ShineGreymon (Burst Mode) | ❌ | Event | |
| +0 | +60 | +120 | +240 | +360 | +480 | +600 | Omegamon Alter-S | ❌ | Event | |
| Maximum | +8300 | |||||||||
DS [Digi-Soul Points]
| Unopened | Normal | Bronze | Silver | Gold | Platinum | Master | Digimon | Digimon Name | Seal Exchange | Drop Location |
|---|---|---|---|---|---|---|---|---|---|---|
| +0 | +10 | +20 | +40 | +60 | +80 | +100 | DemiMeramon | ❌ | Silver Lake Silent Forest Tokyo Tower | |
| +0 | +20 | +40 | +80 | +120 | +160 | +200 | Agumon | ✅ 10/1 Ticket | ||
| +0 | +20 | +40 | +80 | +120 | +160 | +200 | Candlemon | ✅ 10/1 Ticket | Western Village Silver Lake Digimon Maze F1 Tokyo Tower | |
| +0 | +20 | +40 | +80 | +120 | +160 | +200 | ToyAgumon | ✅ 10/1 Ticket | Oil Refinery-3 | |
| +0 | +20 | +40 | +80 | +120 | +160 | +200 | Dorumon | ❌ | Versandi Terminal | |
| +0 | +20 | +40 | +80 | +120 | +160 | +200 | piyomon | ❌ | Wilderness Area | |
| +0 | +20 | +40 | +80 | +120 | +160 | +200 | Gladimon | ❌ | Event | |
| +0 | +20 | +40 | +80 | +120 | +160 | +200 | Heat Wave | ❌ | Event | |
| +0 | +20 | +40 | +80 | +120 | +160 | +200 | Happiness | ❌ | Event | |
| +0 | +30 | +60 | +120 | +180 | +240 | +300 | Coredramon (Green) | ❌ | Western Area: West | |
| +0 | +30 | +60 | +120 | +180 | +240 | +300 | Woodmon | ❌ | Western Village Silver Lake Monster Card Lv3 | |
| +0 | +30 | +60 | +120 | +180 | +240 | +300 | Gesomon | ❌ | Minato City | |
| +0 | +30 | +60 | +120 | +180 | +240 | +300 | Kabuterimon | ❌ | Event | |
| +0 | +30 | +60 | +120 | +180 | +240 | +300 | Yukidarumon | ❌ | Event | |
| +0 | +30 | +60 | +120 | +180 | +240 | +300 | Mikemon | ❌ | Shibuya | |
| +0 | +30 | +60 | +120 | +180 | +240 | +300 | Peckmon | ❌ | Event | |
| +0 | +30 | +60 | +120 | +180 | +240 | +300 | Angemon | ❌ | Event | |
| +0 | +30 | +60 | +120 | +180 | +240 | +300 | Gawappamon | ❌ | Event | |
| +0 | +40 | +80 | +160 | +240 | +320 | +400 | Asuramon | ✅ 1/1 Ticket | Oil Refinery-1 | |
| +0 | +40 | +80 | +160 | +240 | +320 | +400 | SkullGreymon | ❌ | Infinite Ice Wall Dark Tower Wasteland Monster Card Lv6 | |
| +0 | +40 | +80 | +160 | +240 | +320 | +400 | WereGarurumon | ❌ | Oil Refinery-1 Snowman Village Monster Card Lv6 | |
| +0 | +40 | +80 | +160 | +240 | +320 | +400 | MachGaogamon | ❌ | Event | |
| +0 | +50 | +100 | +200 | +300 | +400 | +500 | Diablomon | ❌ | Infinite Ice Wall Digimon Maze F4 Monster Card Lv7 | |
| +0 | +50 | +100 | +200 | +300 | +400 | +500 | Puppetmon | ❌ | Event | |
| +0 | +50 | +100 | +200 | +300 | +400 | +500 | Piedmon | ❌ | Event | |
| +0 | +50 | +100 | +200 | +300 | +400 | +500 | GrandisKuwagamon | ❌ | Event | |
| +0 | +60 | +120 | +240 | +360 | +480 | +600 | Zhuqiaomon | ❌ | Uprising Flame (raid box) | |
| Maximum | +8600 | |||||||||
DE [Defense]
| Unopened | Normal | Bronze | Silver | Gold | Platinum | Master | Digimon | Digimon Name | Seal Exchange | Drop Location |
|---|---|---|---|---|---|---|---|---|---|---|
| +0 | +8 | +16 | +32 | +48 | +64 | +80 | Upamon | ✅ 10/1 Ticket | Silver Lake | |
| +0 | +10 | +20 | +40 | +60 | +80 | +100 | Elecmon | ✅ 10/1 Ticket | Silver Lake | |
| +0 | +10 | +20 | +40 | +60 | +80 | +100 | Goblimon | ❌ | Wilderness Area Silent Forest Digimon Maze F1 Datamon Maze Monster Card Lv2 | |
| +0 | +10 | +20 | +40 | +60 | +80 | +100 | Renamon | ❌ | Western Village Western Area: East Western Area: Outskirts Wilderness Area Frozen Ground Monster Card Lv1 | |
| +0 | +10 | +20 | +40 | +60 | +80 | +100 | Kamemon | ❌ | Event | |
| +0 | +10 | +20 | +40 | +60 | +80 | +100 | Syakomon | ❌ | Minato City | |
| +0 | +10 | +20 | +40 | +60 | +80 | +100 | Palmon | ❌ | Silver Lake Lost Historic Site Infinite Mountain | |
| +0 | +10 | +20 | +40 | +60 | +80 | +100 | Armor | ❌ | Event | |
| +0 | +10 | +20 | +40 | +60 | +80 | +100 | Salamon | ❌ | Event | |
| +0 | +10 | +20 | +40 | +60 | +80 | +100 | PawnChessmon W | ❌ | Event | |
| +0 | +15 | +30 | +60 | +90 | +120 | +150 | Flymon | ❌ | Western Area: Outskirts Server Continent Desert Valley of Light Monster Card Lv3 | |
| +0 | +15 | +30 | +60 | +90 | +120 | +150 | Leomon | ❌ | Western Area: East Western Area: Outskirts Wind Valley Digimon Farm Ruined Historic Monster Card Lv4 | |
| +0 | +15 | +30 | +60 | +90 | +120 | +150 | Meramon | ❌ | Silent Forest Digimon Maze B2 Tokyo Tower Monster Card Lv4 | |
| +0 | +15 | +30 | +60 | +90 | +120 | +150 | Rockmon | ❌ | Western Area: East Digimon Maze Entrance Server Continent Desert Versandi Terminal | |
| +0 | +15 | +30 | +60 | +90 | +120 | +150 | Monochromon | ❌ | Versandi Terminal | |
| +0 | +15 | +30 | +60 | +90 | +120 | +150 | Ankylomon | ❌ | Event | |
| +0 | +15 | +30 | +60 | +90 | +120 | +150 | Shellmon | ❌ | Rainbow Bridge | |
| +0 | +15 | +30 | +60 | +90 | +120 | +150 | Thunderballmon | ❌ | Event | |
| +0 | +15 | +30 | +60 | +90 | +120 | +150 | BaoHackmon | ❌ | Event | |
| +0 | +20 | +40 | +80 | +120 | +160 | +200 | Meteormon | ✅ 1/1 Ticket | Oil Refinery-3 Digimon Maze F3 Server Continent Pyramid | |
| +0 | +20 | +40 | +80 | +120 | +160 | +200 | WaruMonzaemon | ❌ | Digimon Farm Digimon Maze B2 Oil Refinery-1 Odaiba Monster Card Lv5 | |
| +0 | +20 | +40 | +80 | +120 | +160 | +200 | MetalTyrannomon | ❌ | Shinjuku East Area (Night) | |
| +0 | +25 | +50 | +100 | +150 | +200 | +250 | Chimairamon | ❌ | Kaiser's Laboratory (pick up) Monster Card Lv7 | |
| +0 | +25 | +50 | +100 | +150 | +200 | +250 | Sleipmon | ❌ | Royal Base (pick up) | |
| +0 | +25 | +50 | +100 | +150 | +200 | +250 | HerculesKabuterimon | ❌ | Infinite Ice Wall | |
| Maximum | +3680 | |||||||||
BL [Block Rate]
| Unopened | Normal | Bronze | Silver | Gold | Platinum | Master | Digimon | Digimon Name | Seal Exchange | Drop Location |
|---|---|---|---|---|---|---|---|---|---|---|
| +0% | +0.1% | +0.2% | +0.4% | +0.6% | +0.8% | +1% | Dracmon | ❌ | Ancient Ruins of Secret Versandi Terminal Monster Card Lv2 | |
| +0% | +0.1% | +0.2% | +0.4% | +0.6% | +0.8% | +1% | Tentomon | ❌ | Silver Lake Frozen Ground Monster Card Lv2 | |
| +0% | +0.1% | +0.2% | +0.4% | +0.6% | +0.8% | +1% | Agumon (Starter) | ❌ | Event | |
| +0% | +0.1% | +0.2% | +0.4% | +0.6% | +0.8% | +1% | Falcomon | ❌ | Event | |
| +0% | +0.1% | +0.2% | +0.4% | +0.6% | +0.8% | +1% | BlackGabumon | ❌ | Event | |
| +0% | +0.1% | +0.2% | +0.4% | +0.6% | +0.8% | +1% | Firm | ❌ | Event | |
| +0% | +0.1% | +0.2% | +0.4% | +0.6% | +0.8% | +1% | Gomamon | ❌ | Event | |
| +0% | +0.15% | +0.3% | +0.6% | +0.9% | +1.2% | +1.5% | Sangloupmon | ❌ | Oil Refinery-3 Shibuya Monster Card Lv3 | |
| +0% | +0.15% | +0.3% | +0.6% | +0.9% | +1.2% | +1.5% | Waspmon | ❌ | Oil Refinery-2 Lost Historic Site File Island Waterfront Monster Card Lv3 | |
| +0% | +0.2% | +0.4% | +0.8% | +1.2% | +1.6% | +2% | Etemon | ❌ | Server Continent Desert Server Continent Pyramid Datamon Maze Monster Card Lv6 | |
| +0% | +0.2% | +0.4% | +0.8% | +1.2% | +1.6% | +2% | MegaSeadramon | ✅ 1/1 Ticket | Digimon Maze F3 File Island Waterfront Scar of Water Crystal (pick up) | |
| +0% | +0.2% | +0.4% | +0.8% | +1.2% | +1.6% | +2% | Vikaralamon | ✅ 1/1 Ticket | Oil Refinery-3 | |
| +0% | +0.2% | +0.4% | +0.8% | +1.2% | +1.6% | +2% | TankDramon | ❌ | Big Sight | |
| +0% | +0.2% | +0.4% | +0.8% | +1.2% | +1.6% | +2% | Shakkoumon | ❌ | Event | |
| +0% | +0.2% | +0.4% | +0.8% | +1.2% | +1.6% | +2% | Lilamon | ❌ | Event | |
| +0% | +0.25% | +0.5% | +1% | +1.5% | +2% | +2.5% | ShineGreymon | ❌ | Event | |
| +0% | +0.35% | +0.7% | +1.4% | +2.1% | +2.8% | +3.5% | Fanglongmon | ❌ | Event | |
| +0% | +0.4% | +0.8% | +1.6% | +2.4% | +3.2% | +4% | Gallantmon (Crimson Mode) | ❌ | Event | |
| Maximum | +32% | |||||||||
EV [Evade Rate]
| Unopened | Normal | Bronze | Silver | Gold | Platinum | Master | Digimon | Digimon Name | Seal Exchange | Drop Location |
|---|---|---|---|---|---|---|---|---|---|---|
| +0% | +0.2% | +0.2% | +0.4% | +0.6% | +0.8% | +1% | Armadillomon | ✅ 10/1 Ticket | Western Village | |
| +0% | +0.2% | +0.2% | +0.4% | +0.6% | +0.8% | +1% | Impmon | ✅ 10/1 Ticket | Western Village | |
| +0% | +0.2% | +0.2% | +0.4% | +0.6% | +0.8% | +1% | Seal of Coolness | ❌ | Event | |
| +0% | +0.15% | +0.3% | +0.6% | +0.9% | +1.2% | +1.5% | Hagurumon | ❌ | Event | |
| +0% | +0.2% | +0.4% | +0.8% | +1.2% | +1.6% | +2% | Digmon | ✅ 5/1 Ticket | Western Village Lost Historic Site | |
| +0% | +0.2% | +0.4% | +0.8% | +1.2% | +1.6% | +2% | Veedramon | ❌ | Oil Refinery-2 Monster Card Lv3 | |
| +0% | +0.2% | +0.4% | +0.8% | +1.2% | +1.6% | +2% | Gatomon | ❌ | Digimon Farm | |
| +0% | +0.2% | +0.4% | +0.8% | +1.2% | +1.6% | +2% | Allomon | ❌ | Versandi Terminal | |
| +0% | +0.2% | +0.4% | +0.8% | +1.2% | +1.6% | +2% | Growlmon | ❌ | Shinjuku Western Area (Night) | |
| +0% | +0.2% | +0.4% | +0.8% | +1.2% | +1.6% | +2% | Yasyamon | ❌ | Odaiba | |
| +0% | ¨+0.2% | +0.4% | +0.8% | +1.2% | +1.6% | +2% | BlackGatomon | ❌ | Shibuya | |
| +0% | +0.3% | +0.6% | +1.2% | +1.8% | +2.4% | +3% | Lillymon | ✅ 1/1 Ticket | Silver Lake Versandi Terminal | |
| +0% | +0.3% | +0.6% | +1.2% | +1.8% | +2.4% | +3% | Mystimon | ✅ 1/1 Ticket | Lost Historic Site | |
| +0% | +0.3% | +0.6% | +1.2% | +1.8% | +2.4% | +3% | NeoDevimon | ❌ | Oil Refinery-3 File Island Waterfront Big Sight Monster Card Lv5 | |
| +0% | +0.3% | +0.6% | +1.2% | +1.8% | +2.4% | +3% | Rapidmon | ❌ | File Island Waterfront | |
| +0% | +0.3% | +0.6% | +1.2% | +1.8% | +2.4% | +3% | SaviorHackmon | ❌ | Event | |
| +0% | +0.3% | +0.6% | +1.2% | +1.8% | +2.4% | +3% | MegaKabuterimon | ❌ | Distorted Data Village | |
| +0% | +0.35% | +0.7% | +1.4% | +2.1% | +2.8% | +3.5% | Dynasmon | ❌ | Royal Base (pick up) | |
| +0% | +0.35% | +0.7% | +1.4% | +2.1% | +2.8% | +3.5% | DexDorugoramon | ❌ | Event | |
| +0% | +0.35% | +0.7% | +1.4% | +2.1% | +2.8% | +3.5% | Bokomon | ❌ | Event | |
| +0% | +0.35% | +0.7% | +1.4% | +2.1% | +2.8% | +3.5% | MirageGaogamon | ❌ | Event | |
| +0% | +0.35% | +0.7% | +1.4% | +2.1% | +2.8% | +3.5% | Ravemon | ❌ | Event | |
| +0% | +0.4% | +0.8% | +1.6% | +2.4% | +3.2% | +4% | Rosemon (Burst Mode) | ❌ | Event | |
| +0% | +0.4% | +0.8% | +1.6% | +2.4% | +3.2% | +4% | Marsmon | ❌ | Event | |
| Maximum | +62% | |||||||||